Upgrading to VSI OpenVMS x86-64 E9.2-4
This section describes how to upgrade to OpenVMS E9.2-4 from OpenVMS V9.2-2 or V9.2-3. Upgrading to E9.2-4 from earlier versions of OpenVMS is not possible. If you want to perform a fresh installation, see Installing VSI OpenVMS x86-64 E9.2-4.
Before upgrading from one of the supported versions, make sure to install the following patches:
| OpenVMS version | Required patches |
|---|---|
| OpenVMS x86-64 V9.2-2 | Update V2 and BOOTMGR V1 |
| OpenVMS x86-64 V9.2-3 | PCSI V1 and BOOTMGR V1 |
Creating a Non-Shadowed Target Disk From a Shadowed Disk
It is not possible to upgrade VSI OpenVMS on a shadowed system disk; the procedure will always fail. You will need to disable system disk shadowing before you can upgrade the operating system. If you are using a non-shadowed system disk, skip this section and proceed to Upgrading a Non-Shadowed System Disk.
To disable shadowing on a system disk, follow these steps:
-
Make a backup copy of the system disk. For details, refer to the System Management Utilities Reference Manual, Volume I.
-
Execute the VSI$SUPPORT command procedure1 to create a report containing a snapshot of the system configuration:
$ @SYS$MANAGER:VSI$SUPPORTOnce the report is created, copy it to another system.
-
Enter the command
@SYS$SYSTEM:SHUTDOWN.COMto shut down the system booted from the shadowed system disk that you want to upgrade. -
The procedure will ask you several questions. Give appropriate answers but make sure to answer
NOwhen asked for permission to perform an automatic reboot or power off. -
Once you have shut down the system, you will need to perform a conversational (interactive) boot from the system disk that you want to upgrade. To begin, enter the following command at the UEFI Shell prompt:
Shell> fsn:\efi\vms\vms_bootmgr.efiwhere
fsnis the file system associated with the shadowed system disk device that you want to upgrade. If you do not know which file system you need, enter the commandmap fs*to display all file systems available on your VM and look for the one associated with the shadowed system disk that you want to upgrade. -
Once you have selected the file system that you want to work with (for example, fs1) and entered the command mentioned in the previous step, you will see the
BOOTMGR>prompt. -
On the boot manager startup screen, you will see the default boot command template, similar to the following:
DEFAULT BOOT COMMAND: BOOT your-device 0xnn 0Xnnnnnnnnwhere
0xnnstands for the system root and0Xnnnnnnnnstands for the flags that you can specify.To perform a conversational boot, you must boot from your system disk with the system root that you normally use (0 by default) and the boot flag set to 1. To do so, enter the following command, which is based on the template that you saw on your Boot Manager screen (bear in mind that yours might be slightly different):
BOOTMGR> BOOT your-device 0 1You will see the
SYSBOOT>prompt. -
At the
SYSBOOT>prompt, enter the following command to disable volume shadowing on your system disk:SYSBOOT> SET SHADOW_SYS_DISK 0 -
At the
SYSBOOT>prompt, enterCONTINUEto resume the boot procedure. -
After the boot completes, log in to the SYSTEM account.
-
Shut down the system by entering the command:
$ @SYS$SYSTEM:SHUTDOWN.COM -
When asked whether an automatic system reboot or power off should be performed, answer
NO.
You now have a non-shadowed system disk that you can use for the upgrade. Go to Upgrading a Non-Shadowed System Disk to begin the upgrade procedure. For more information on volume shadowing, refer to the VSI OpenVMS Volume Shadowing Guide.
Upgrading a Non-Shadowed System Disk
Dismount system disk
Before performing the upgrade, ensure that the system disk is properly dismounted from all other nodes in the cluster. Failure to follow this precaution may result in getting the following error messages on reboot after the installation:
%SYSINIT-E- unable to mount the system disk
%SYSINIT-E- error mounting system device
            status = 0072832C
   .
   .
   .
** Bugcheck code = 0000036C: PROCGONE, Process not in system
If this happens, issue the command DISMOUNT/CLUSTER system-disk-name on a node that has this disk mounted. Then, repeat the boot attempt.
To upgrade to VSI OpenVMS x86-64 E9.2-4 from a supported earlier version, follow these steps:
-
Download and unzip the VSI OpenVMS x86-64 E9.2-4 kit, then copy the ISO file to an area that is locally accessible to your hypervisor.
Note
VSI recommends that you make a backup copy of the system disk before starting the upgrade procedure.
-
Power off the virtual machine that you want to upgrade to VSI OpenVMS x86-64 E9.2-4. You can do this either from your virtual machine management application or by using the POWER_OFF option in SYS$SYSTEM:SHUTDOWN.COM.
-
Bring up the screen to edit its settings. Find the CD-ROM/DVD-ROM device that your virtual machine is using and change the ISO file associated with the optical device to the E9.2-4 ISO file.
-
Save the changes and close the settings window.
-
Power on your VM. Depending on your hypervisor of choice and the boot settings of your VM, you will either see the UEFI
Shell>prompt or the VSI Boot Manager screen.EFI Shell version 2.70 [1.0] Current running mode 1.1.2 Device mapping table fs0 :CDRom - Alias cd21b0a0 blk0 PciRoot(0x0)/Pci(0x11,0x0)/Pci(0x1,0x0)/Sata(0x1,0x0,0x0)/CDROM(0x0,0x1B,0xE800) . . . Press ESC in 1 seconds to skip startup.nsh, any other key to continue. Shell>Perform the following steps:
- At the
Shell>prompt, entermap fs*to display all file systems available on your VM. - Locate the file system that maps to the VSI OpenVMS E9.2-4 ISO file. Since that ISO has been set up as a CDROM, the file system that maps to it will be labeled as CDROM as well. As an example, we will assume that the file system we want is FS0.
- At the
Shell>prompt, enter:fs0:\efi\vms\vms_bootmgr.efi
After this, you should see the VSI Boot Manager screen. Proceed to the next step.
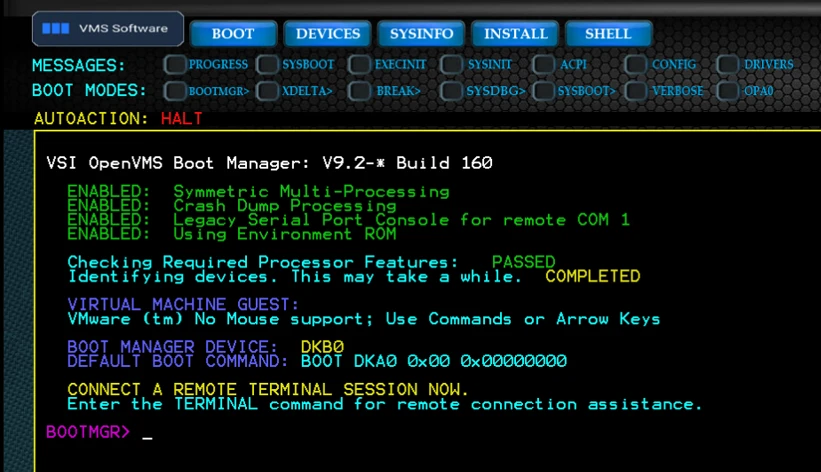
Proceed to the next step.
- At the
-
If you plan to use the Guest Console feature instead of a serial port, enter
OPA0at theBOOTMGR>prompt or select the OPA0 checkbox with the arrow keys and press Enter.You will see the following message indicating that the Guest Console is enabled:
ENABLED: Guest Console OPA0 terminal (use local keyboard & display instead of serial port).
The Guest Console provides a minimal OPA0 terminal (no resizing or cut-and-paste).
SET TERM/INQUIRE to set the terminal size.
For more information, refer to the VSI OpenVMS x86-64 Boot Manager User Guide.
-
At the
BOOTMGR>prompt, enterDEVICESto display the list of available bootable OpenVMS devices.Note
Boot Manager connects the UEFI drivers for detected controllers to ensure that all available boot devices are discovered. On systems with a large number of controllers or Fibre Channel devices, delays may be encountered during the process. The following informational message is displayed:
Identifying devices. This may take a while. COMPLETED -
From the list, identify the device that contains the ISO file with the new version of VSI OpenVMS (it will be labeled as a CDROM or DVD). Enter
BOOT device-name, wheredevice-nameis the name of the disk that contains your ISO file (not the name of the ISO file itself). As an example, we enter:BOOT DKA100What you see after the progress meter reaches 100% depends on whether you are using the Guest Console or a serial port.
You should see the OpenVMS installation menu. Proceed to the next step.
You should see the following screen:
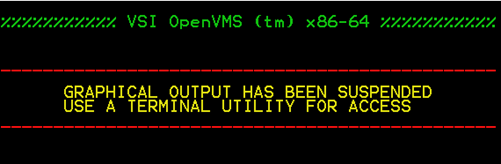
Establish a remote connection to your VM via a terminal emulator. Depending on your hypervisor of choice, VSI recommends using the following methods:
You can choose to connect via Telnet or a named pipe, depending on how you set up your VM (see the serial-port setup step in OpenVMS on ESXi).
Note
Make sure that the port used by your VM can go through the ESXi firewall. If you are having trouble at this stage, refer to OpenVMS on ESXi.
Perform the following procedure:
- Make sure that the serial console is enabled and started on the host server.
- Make sure that virsh is connected to the hypervisor that you are using.
- Start virsh and enter the command
console vm-name, wherevm-nameis the name of the VM that you want to connect to.
For more details, refer to OpenVMS on KVM.
When the
BOOTMGR>prompt appears, your terminal emulator should automatically connect to your VM. However, if that does not happen, you can initiate command output to the serial port manually by entering the command:BOOTMGR> COM nwhere
nis the serial port number that your VM uses. For more information, refer to Routing and Logging Boot Manager Output. -
Upon connecting, you should see the VSI OpenVMS installation menu and/or the
Enter CHOICE or ? for help: (1/2/3/4/5/6/7/8/9/?)prompt.Note
If the prompt does not appear, and the output appears blank or unchanging, press Enter. The prompt should now appear. To see the OpenVMS installation menu, type
?, then hit Enter two times.Important
VSI OpenVMS x86-64 E9.2-4 does not support installation menu items number 3, 5, and 7. Also, do not use item number 6 unless directly instructed otherwise.
-
Read this step only if you have VSI OpenSSH V8.9-1H01 or earlier installed on your system. If you do not, skip to the next step.
If you have this version of VSI OpenSSH installed, you will see a message similar to the following during the upgrade:
%PCSI-E-EXERMVFAIL, product supplied EXECUTE REMOVE procedure failed
-CREATE-E-DIRNOTCRE, !AS directory file not created
%PCSI-E-OPFAILED, operation failed
Terminating is strongly recommended. Do you want to terminate? [YES]
Ignore this message. Answer
NOand continue the upgrade procedure as normal.If you have VSI OpenSSH V8.9-1G or earlier installed on your system, you must uninstall it now, otherwise the upgrade procedure will abort.
To proceed, you must know the name of the system disk you will be upgrading. If you do not know the name, follow these steps to find the disk:
- In the VSI OpenVMS installation menu, select
8 - Execute DCL commands and procedures. - At the
$$$prompt, enterSHOW DEVICES DKto display the list of available disks. - If you are unsure which system disk to upgrade, you may need to mount each of the local disks individually until you find the desired one.
- Type
LOGOUTto return to the VSI OpenVMS installation menu.
To uninstall VSI OpenSSH, perform the following procedure:
- In the VSI OpenVMS installation menu, enter
6 - Remove installed products. - At the prompt for the target disk, enter the name of the system disk that you will be upgrading.
- Accept the default answer for the detailed description prompt.
- You will see a list of installed products. Enter the item number that represents VSI OpenSSH.
- Answer
YESto theDo you want to continue?question. - Answer
NOto each of theDo you want to terminate?questions. - When the product is removed, you will see the
Press Return to continue...prompt. Press Enter. - You will see the VSI OpenVMS installation menu.
- In the VSI OpenVMS installation menu, select
-
Enter
1to start the upgrade procedure. -
You will see the
Do you want to INITIALIZE or to PRESERVE?question. EnterPRESERVE. -
At the
Enter device name for target disk:prompt, enter the name of the disk where your current version of VSI OpenVMS is installed. If you are not sure which disk that is, enter??to display a list of available disks with volume names. -
You will see a message stating the current label of the selected disk. Specify whether you want to keep the label or change it.
-
After confirming or changing the disk label, you will see the
Do you want to create or validate boot options?question. The answer is up to you. As an example, we will answerYES.Note
Unlike a fresh installation, the existing SYSTEM account password remains unchanged during an upgrade.
-
If you have any installed patches with recovery data, they will be displayed followed by the
Do you want to continue?prompt. EnterYES. -
You will see a list of installed products and information on how the upgrade procedure will handle each one.
If DECnet-Plus is not installed on your system, you will see a prompt to install it. The answer is up to you. If you choose to install DECnet-Plus, and DECnet Phase IV is already installed on your system, you will be prompted to remove it.
-
You will see the
Do you always want detailed descriptions?question. The answer is up to you. As an example, we will answerNO. -
The product kit validation will proceed, and then the configuration phase will start. You will then see the
Do you want the defaults for all options?question. The recommended answer isYES.Note
As the configuration phase starts and progresses, some of the products will require the system to be rebooted. If you see the
Can the system be REBOOTED after the installation completes?question, always answerYES. AnsweringNOwill abort the upgrade.With the default options selected, the following components and procedures will be installed or performed:
- VSI OpenVMS E9.2-4
- DECdtm Distributed Transaction Manager
- Support for DECnet-Plus or DECnet (Phase IV) for OpenVMS
- Programming Support
- Debugger Utility
- Image Dump Utility
- Macro libraries
- Macro-32 Migration Compiler
- TLB intermediary form of STARLET
- C Header Files
- VMS text libraries of Ada declarations
- RMS Journaling Recovery Utility
- System Programming Support
- Delta Debugger
- System Dump Analyzer Utility
- Miscellaneous Symbol Table Files
- Utilities
- Phone Utility
- XPG4 Internationalization Utilities
- World Wide PostScript Printing Subsystem
- Bliss Require Files
- Example Files
- Message Facility Files (HELP/MESSAGE)
- UETP Files
- DECwindows Server Support
- DECwindows workstation files
- Video fonts
- 100 dots-per-inch video fonts
- Euro base support
- Euro 100 dots-per-inch video fonts
- Delete any obsolete OpenVMS files
- Delete files archived by OpenVMS remedial kits
- Availability Manager (base) for OpenVMS x86-64
- VSI Availability Manager Base OS Drivers
- TCP/IP Services for OpenVMS x86-64
- VSI TCP/IP Services for OpenVMS V6.0-31
- VSI SSL3 for OpenVMS x86-64 V3.0-21
- VSI TCP/IP Services for OpenVMS V6.0-31
- Applications
- KERBEROS V3.3-5A for OpenVMS X86-64
- SSL3 V3.0-21 for OpenVMS X86-64
- VSI OpenSSH V9.9-2C for OpenVMS X86-64
- VSI OpenLDAP V2.6-6B for OpenVMS X86-64
- VSI 64-bit PERL V5.42-0 for OpenVMS X86-64
- DECwindows Motif V1.8-2 for OpenVMS X86-64
- Install Low Bandwidth X (LBX) Support
- Install the DECwindows Motif Version 1.8-2 client software
- Install New Desktop
- Install Manual (reference) pages for the New Desktop
- Make the New Desktop the default desktop
- Install traditional DECwindows Desktop
- Programming Support for the C Language
- Programming Support for the Pascal Language
- Programming Support for the FORTRAN Language
- Programming Support for the New Desktop
- Programming examples
- Sound example files
- Programming examples for DECwindows
- Programming examples for the New Desktop
- Install New Desktop
- VSI DECnet-Plus V9.2-I for OpenVMS X86-64
- DECdns Server software
- DECdts Server software
- DECnet Phase IV for OpenVMS X86-64
If you prefer not to install some of these components, answer
NO, and the system will prompt you about installing each component individually. If any subcomponent is not desired, you must first choose to install the main component, and then you will be asked about each subcomponent. In most cases, this level of customization is not necessary and may corrupt important system components. It is recommended to avoid this unless absolutely required.Depending on what other components are currently installed or not installed on your system, you might get additional prompts asking for your consent to install them.
- VSI OpenVMS E9.2-4
-
Once the upgrade procedure has configured the layered products, you will see the
Do you want to review the options?prompt. The answer is up to you. As an example, we will answerNO. -
As the execution phase starts and progresses, you will see several PCSI messages along with the
Do you want to continue?prompt for one or more of the products that will be installed. AnswerYESto all such prompts. -
After the
Portion done:meter reaches 100%, you will see the list of installed and uninstalled products followed by post-installation information for some of them. Once the system updates the Memory Disk (which may take several seconds), the upgrade procedure is complete. You will see thePress Return to continue...prompt. Press Enter. -
You will see the VSI OpenVMS installation menu and the
Enter CHOICE or ? for help: (1/2/3/4/5/6/7/8/9/?)prompt. Enter9to shut down the system. -
The system will shut down and display the
**** Hit any key to reboot system ****prompt. Press any key to reboot the system. -
Depending on your hypervisor of choice, you will either see the VSI Boot Manager screen or the UEFI screen.
Perform the following steps:
- At the
Shell>prompt, entermap fs*to display all file systems available on your VM. - Find the file system for the newly upgraded system disk. If the correct file system is not readily apparent, use the file system for the CD-ROM device which had the installation ISO mapped to it.
- At the
Shell>prompt, enter:fs1:\efi\vms\vms_bootmgr.efi
You should see the VSI Boot Manager screen. Proceed to the next step.
Proceed to the next step.
- At the
-
At the
BOOTMGR>prompt, enterDEVICESto display the list of available bootable OpenVMS devices. -
At the
BOOTMGR>prompt, enterBOOT system-disk-name, wheresystem-disk-nameis the disk that you specified as the target disk for the OpenVMS upgrade (in this step). The OpenVMS volume label for the device should be identified as the one you used for your target device, not for the CD-ROM/DVD-ROM device. In this example, we will enterBOOT DKA0. The system will boot, run the AUTOGEN command procedure, and reboot. Depending on the configuration, this operation may take several minutes. Please take note of and investigate any warnings that AUTOGEN may display. -
When you see the
BOOTMGR>prompt again, enterDEVICESto display the list of available bootable devices. Then, enterBOOT system-disk-nameone more time and wait for the system to boot. Press Enter when you see an output similar to this:Accounting information: Buffered I/O count: 5631 Peak working set size: 19184 Direct I/O count: 15627 Peak virtual size: 258032 Page faults: 9900 Mounted volumes: 0 Charged CPU time: 0 00:00:10.59 Elapsed time: 0 00:01:31.14This output indicates that the OpenVMS boot process has completed.
-
Log in to the system.
-
Now you should register your new licenses, if necessary. Refer to Licensing on OpenVMS x86-64.
You have successfully upgraded to VSI OpenVMS x86-64 E9.2-4.
-
The latest version of VSI$SUPPORT is available at products.vmssoftware.com/vsisupport. ↩