ESXi Virtual Machine Creation Procedure
Perform the following steps to create a VMware ESXi virtual machine for use with VSI OpenVMS x86-64. The instructions in this section were tested on VMware ESXi 8.0.
-
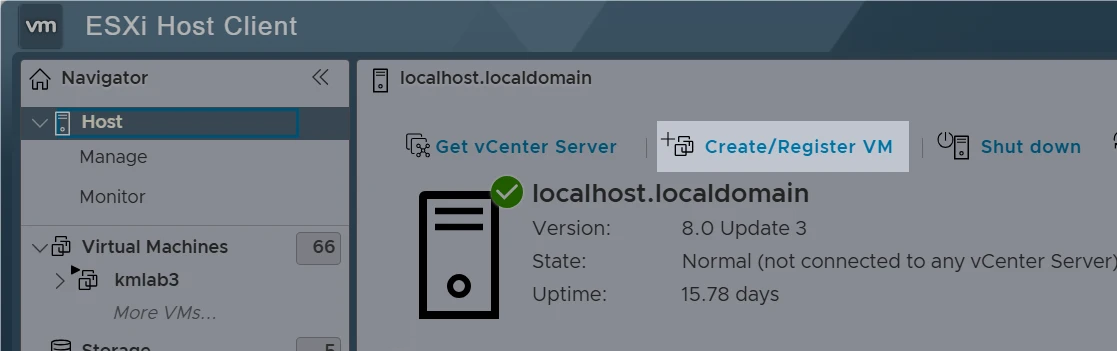
In the left pane of the ESXi Host Client window, click Host, then click Create/Register VM in the right pane.
-
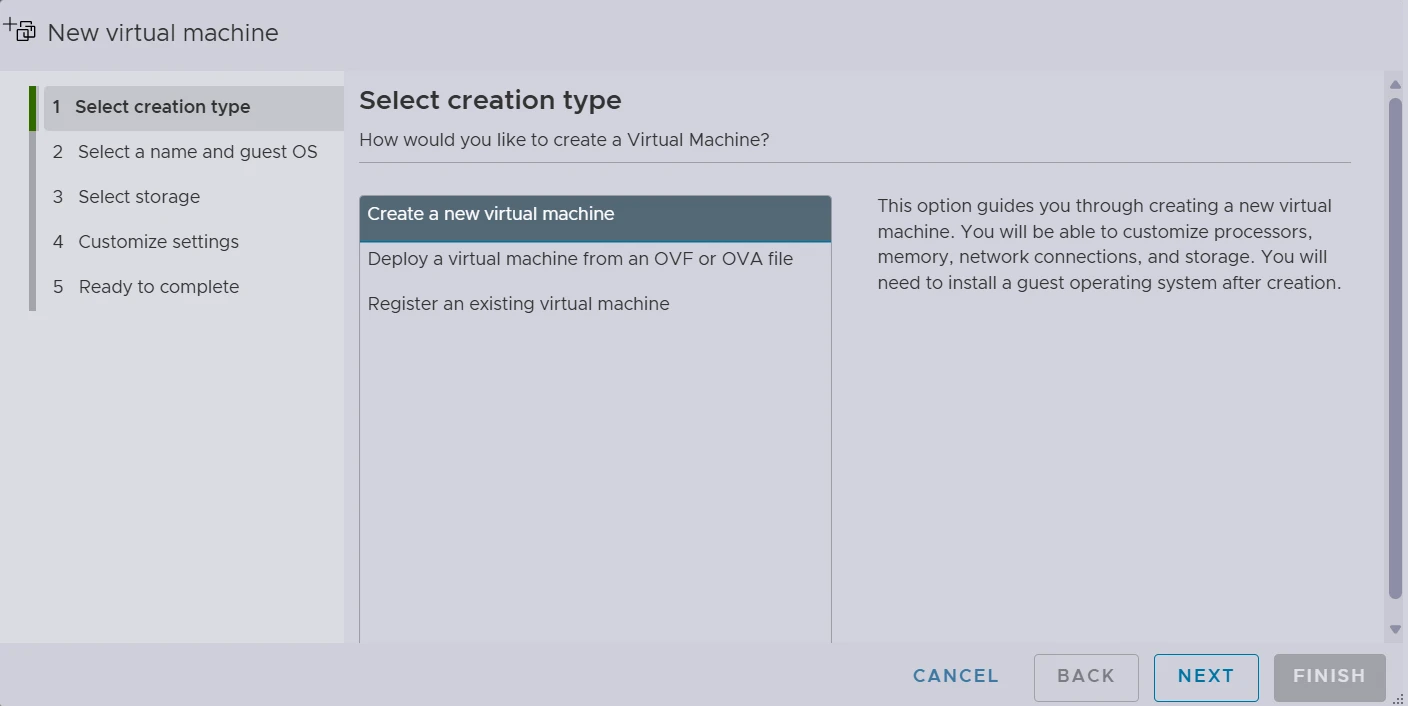
A New virtual machine wizard will open. It will guide you through the steps needed to create a new ESXi virtual machine. In the right pane, you will be able to choose the parameters and specify values to be used in your virtual machine configuration.
-
Select creation type: Make sure that the Create a new virtual machine option is selected, then click Next.
-
Select a name and guest OS:
- In the Name field, enter a name for your VM.
- In the Compatibility drop-down menu, choose the desired version of the ESXi virtual machine.
- In the Guest OS family drop-down menu, select Other.
- In the Guest OS version drop-down menu, select Other (64-bit).
Click Next.
-
Select Storage: Choose the datastore that you created in the previous section.
-
Customize settings: At this stage, you must specify certain values that are required for VSI OpenVMS. Scroll down or expand categories to find the necessary parameters and specify the following mandatory values for the Virtual Hardware:
- CPU: a minimum of 2 and up to 32. 1
- Memory: a minimum of 6 GB.
-
Hard disk 1: a minimum of 30 GB and a maximum of 1.98 TB.
- Disk provisioning: Thick-provisioned, lazily zeroed. Thin provisioning is not supported on OpenVMS.
-
Controller location: Choose the appropriate controller.
Note
-
In order to assign a VMware Paravirtual controller to the disk, refer to the Adding a VMware Paravirtual Controller section.
-
OpenVMS on VMware ESXi supports up to four LSI Logic Parallel SCSI controllers per virtual machine.
Find an up-to-date list of supported controllers on the Supported Platforms page.
-
-
Network adapter 1: VM Network.
- Adapter type: For a list of supported adapters, refer to the Recommended ESXi Virtual Machine Settings for your version of OpenVMS. Click the Add network adapter tab to add multiple adapters.
You can add up to 10 network adapters.
-
CD/DVD drive 1: Select Datastore ISO file from the drop-down menu. In the pop-up window, find and select your VSI OpenVMS ISO installer file.
After you click Select in the pop-up window, the CD/DVD media field in the New virtual machine window will automatically display the path to your VSI OpenVMS ISO file.
Attention
Make sure that the ISO file is mapped to the SATA controller by selecting SATA controller n from the Controller location drop-down menu.
-
Add a serial port by clicking the Add other device tab at the top of the window and selecting Serial port. You will see the New Serial Port category appear among other categories.
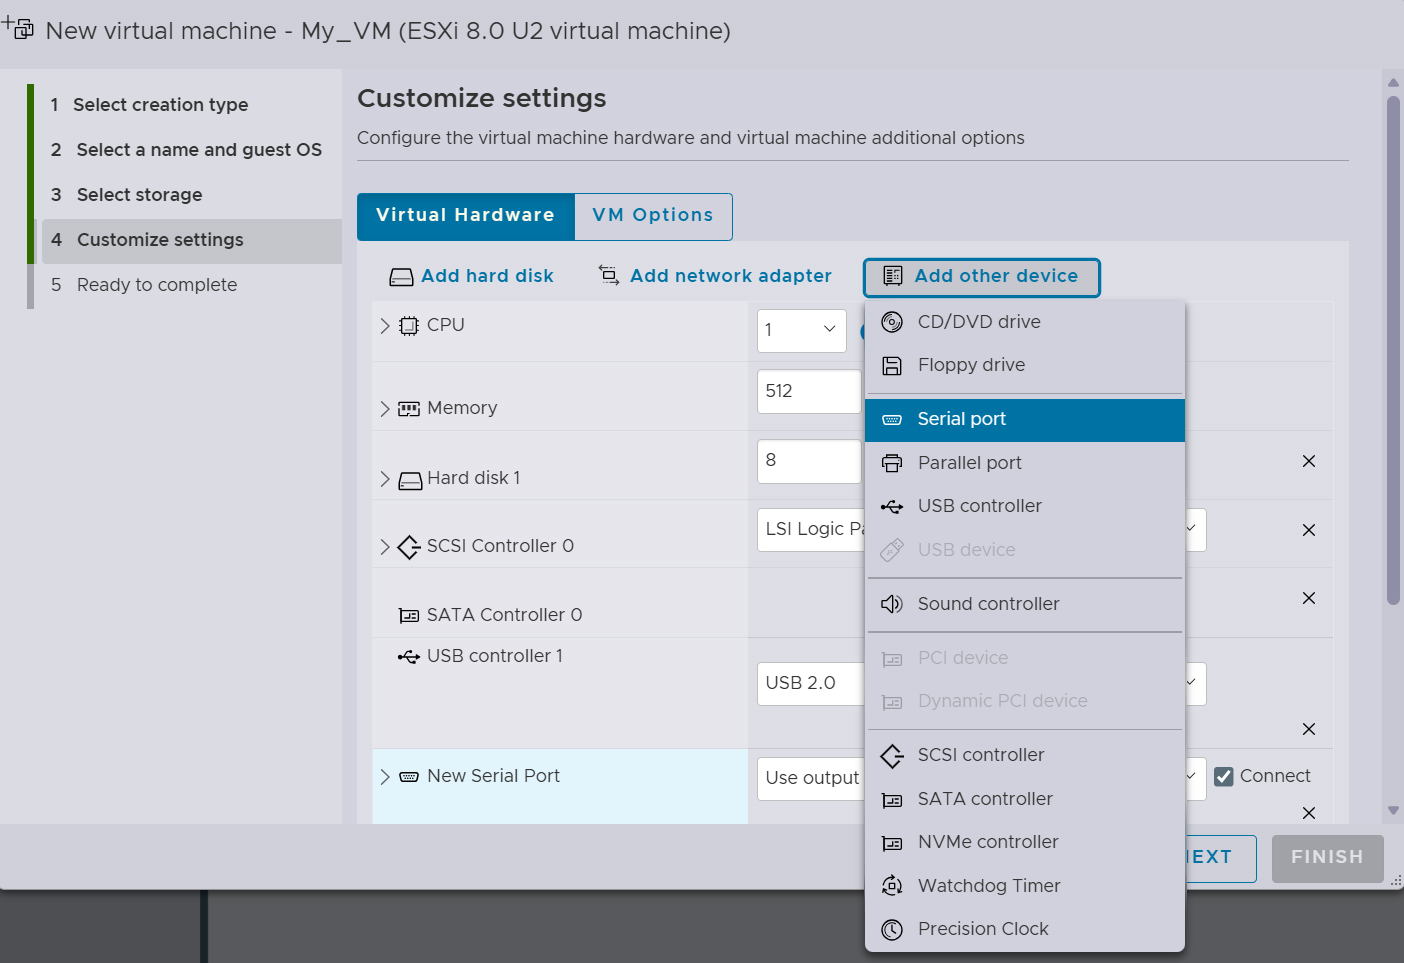
Choose Use network from the drop-down menu and specify the port in the Port URI field in the following format:
protocol://:port. For example:tcp://:8045Make sure that Server is selected in the Direction drop-down menu.
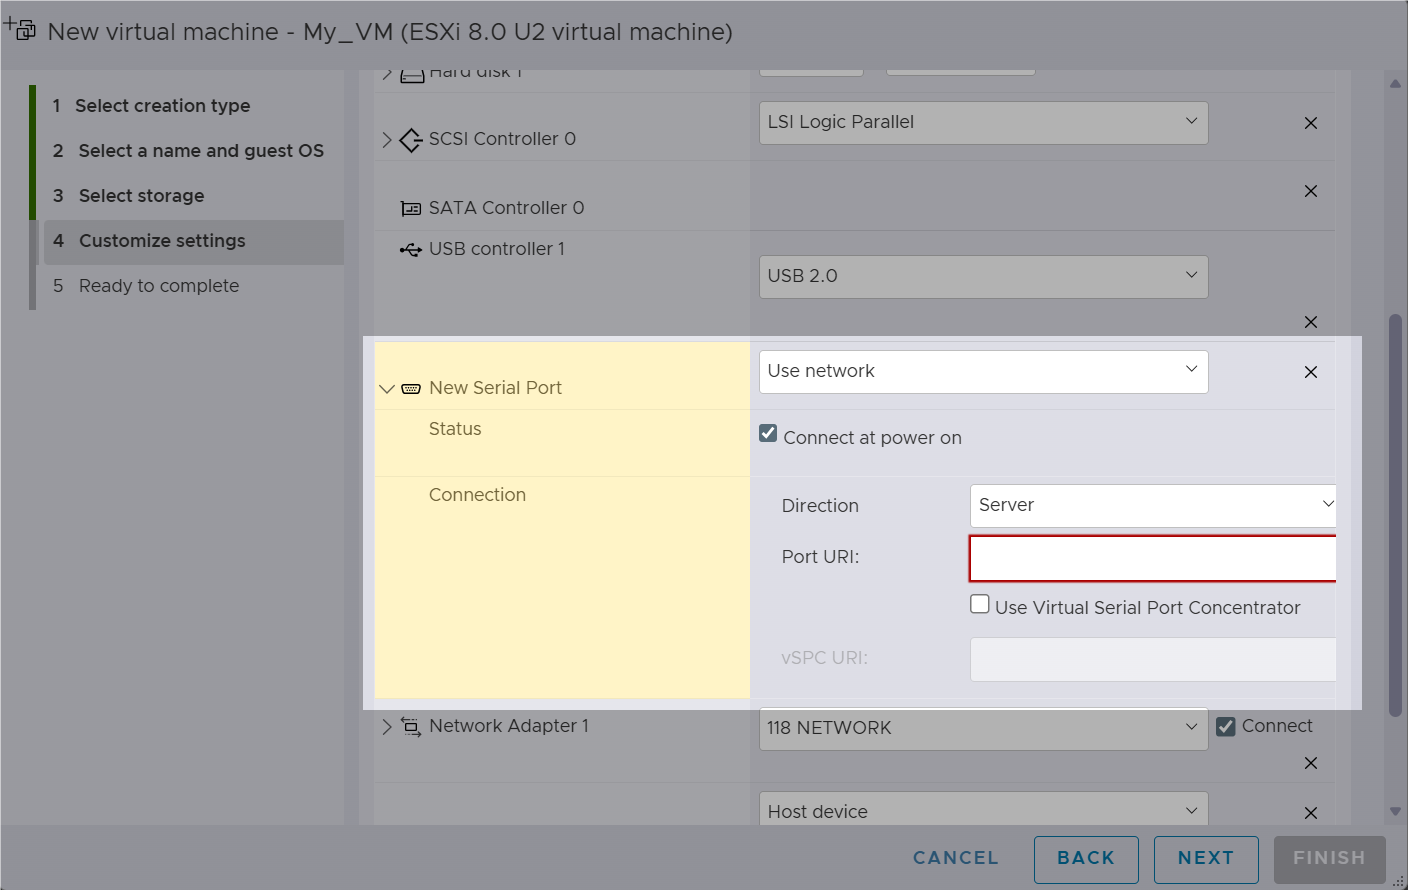
Attention
For the connection via serial port to work, you need to configure the ESXi firewall as described in Configuring VMware ESXi Firewall.
Click Next.
-
Ready to complete: In the right pane, you will see the parameters and values that will be used in your virtual machine configuration. Make sure to review them and check that they meet the recommended ESXi virtual machine settings for your VSI OpenVMS version. If necessary, click the Back button and edit the values.
-
Click Finish.
Additional Configuration
Mandatory Steps
You must perform the following additional configuration steps after you have created a virtual machine.
-
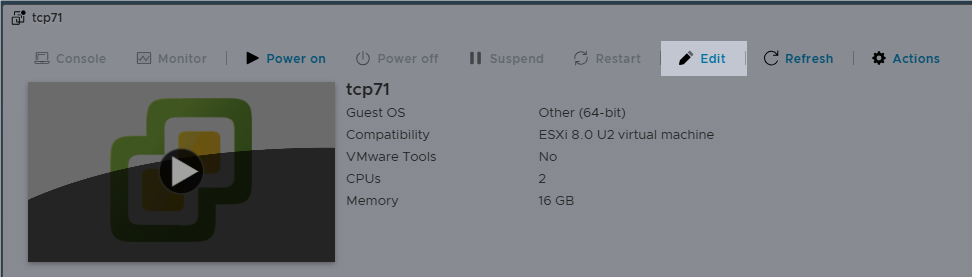
In the left pane of the ESXi Host Client, click on the virtual machine that you have just created. Then click Edit in the main window. A new pop-up window will open.
-
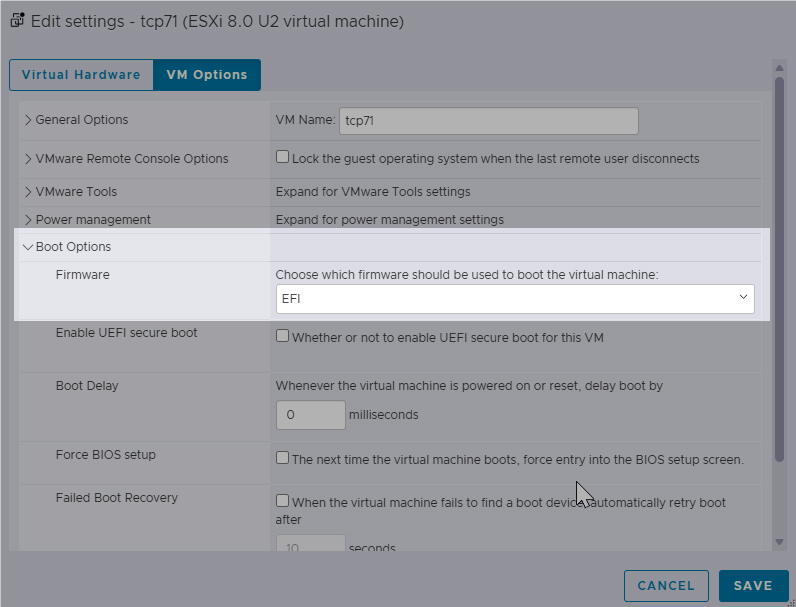
Click the VM Options button at the top of the window, then select the Boot Options category to see the firmware options. Choose EFI from the drop-down list.
-
Expand the Advanced section, click the Edit Configuration button in the right pane. The Configuration Parameters window will open.
-
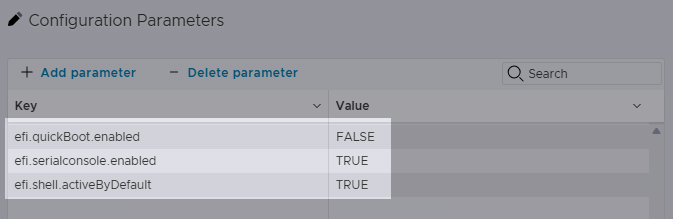
Use the Add parameter button to add the following parameters:
- efi.quickBoot.enabled = FALSE
- efi.serialconsole.enabled = TRUE
- efi.shell.activeByDefault = TRUE
-
Click OK.
-
Click Save in the Edit settings window.
Optional Steps
The parameters specified below are not required but are generally recommended by VSI to ensure your virtual machine works properly.
-
In the left pane of the ESXi Host Client, click on the virtual machine that you have just created. Then click Edit in the main window. A new pop-up window will open.
-
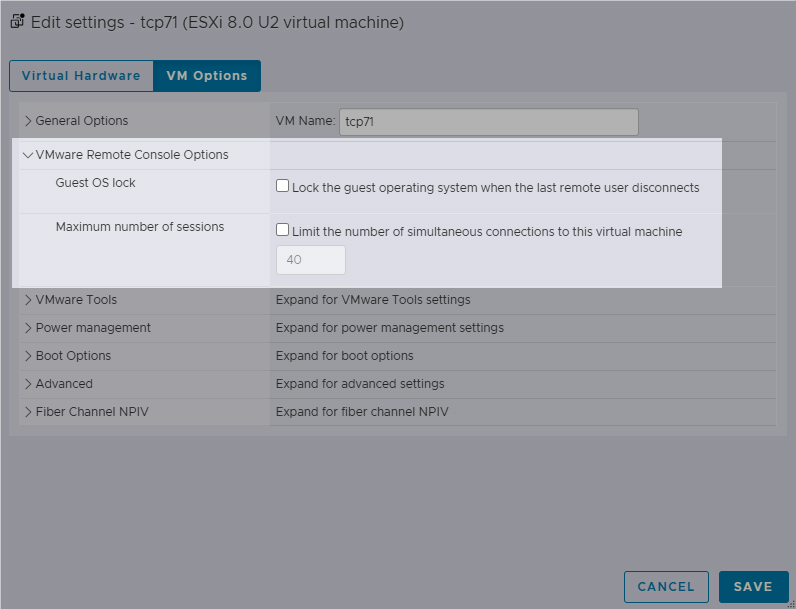
Click the VM Options button, expand the VMware Remote Console Options category, and uncheck the boxes as shown below:
-
Click Save.
-
Expand the CPU section by clicking on it to customize the distribution of cores between virtual sockets. ↩