vMotion: Detailed Configuration and Migration Procedure
This page describes the same steps as VMware vMotion Overview but provides detailed instructions for every installation and configuration stage.
Step 1: Set a Static IP on the ESXi Hosts
- At the physical (or virtual) console of the host, wait for the Direct Console User Interface (DCUI) yellow/gray screen, then press F2 and log in as root.
- Select Configure Management Network.
-
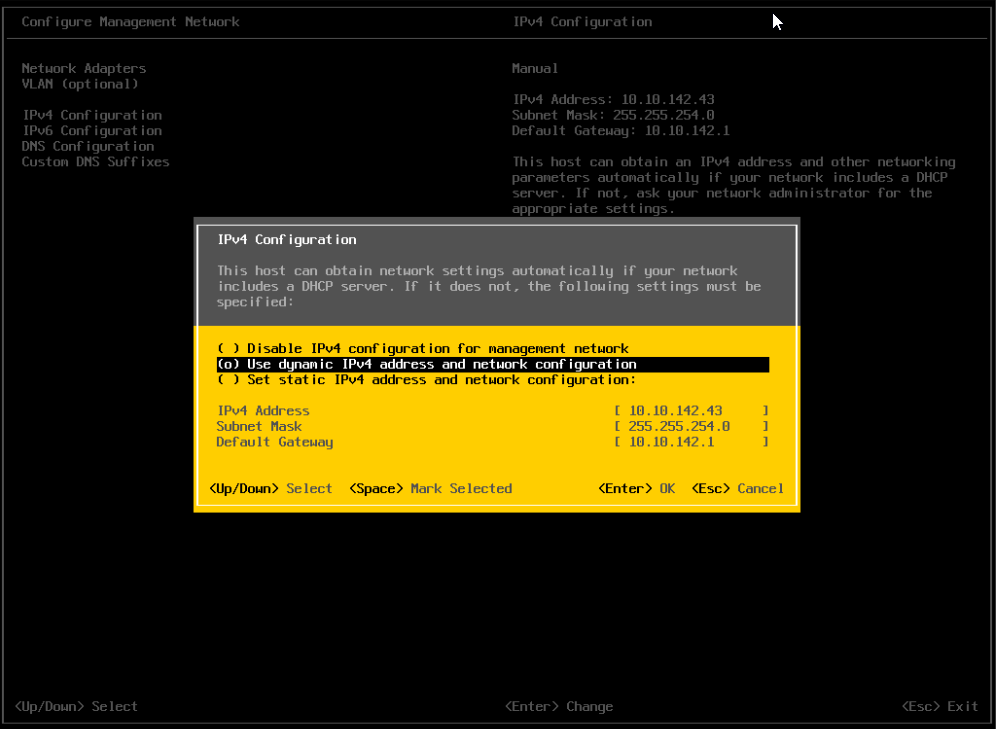
Select IPv4 Configuration, change the setting to Static, and enter the IP address, subnet mask, and default gateway.
-
Select DNS Configuration if needed and enter DNS server addresses/hostname.
- Press Esc, then confirm with Y to apply the changes and restart the management network.
Repeat the DCUI > Configure Management Network steps above on every additional ESXi host, giving each its own static IP address, but keeping NIC layout and network configuration identical across hosts.
Step 2: Create iSCSI Shared Storage
- In the ESXi Host Client, click Storage > Adapters > Software iSCSI. A new window will open.
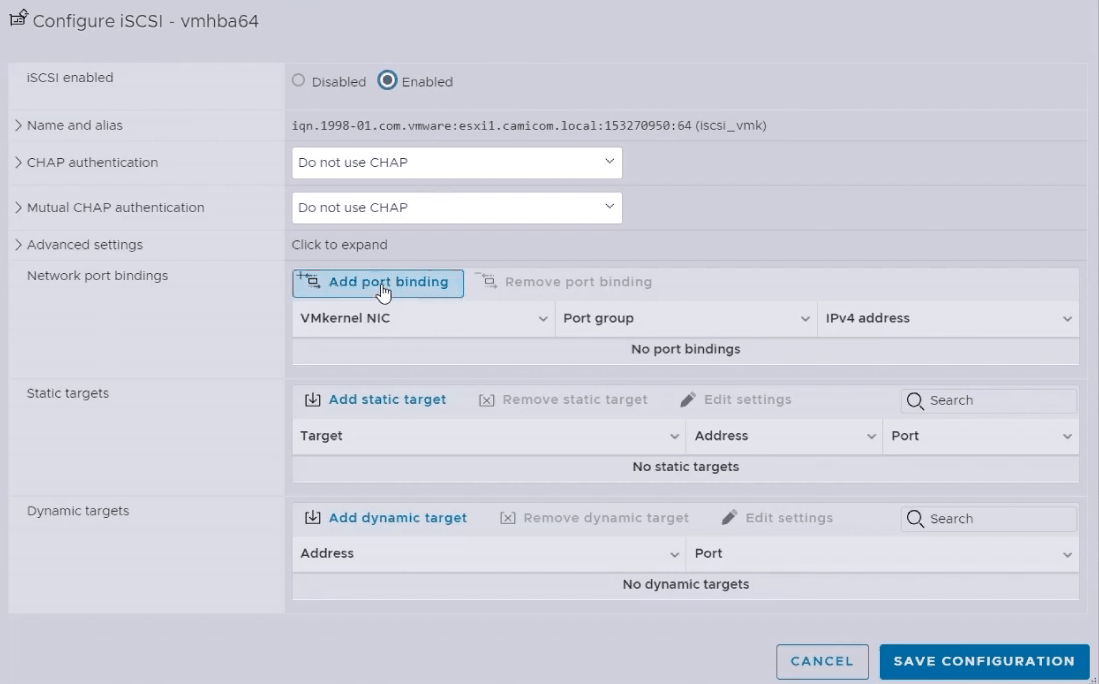
- Set iSCSI enabled to Enabled.
- In the Network port bindings section, click Add port binding and select a VMkernel interface. Click Select to save the changes.
-
In the Dynamic targets section, specify the IP address of your iSCSI storage.
-
Click Save Configuration.
-
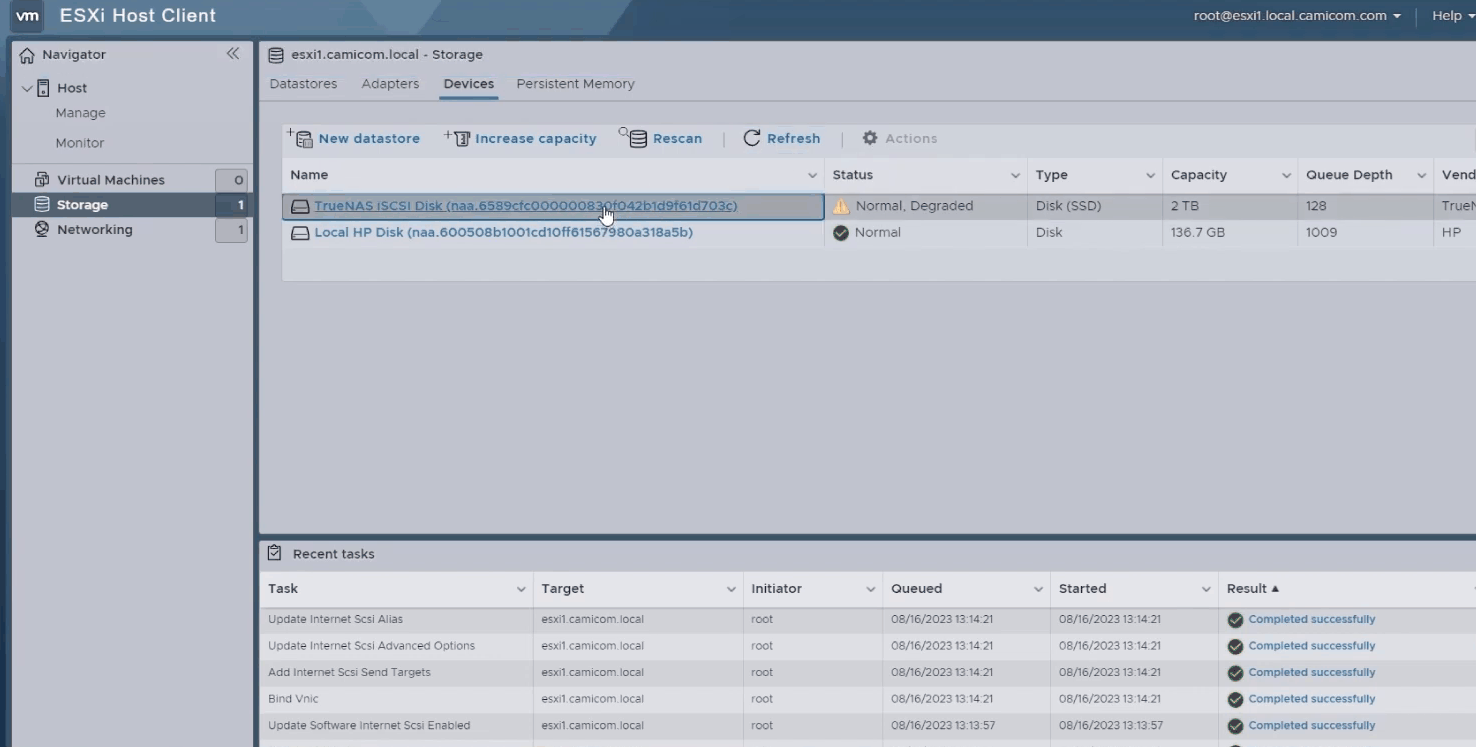
Click the Refresh button, then click Devices. You will see your newly added iSCSI storage.
-
Click on the iSCSI storage name, then click New datastore. A New datastore wizard will open.
- In the Datastore name section, specify the name for your datastore, then click Next.
-
In the Select partitioning options section, use the default values. Click Next.
-
In the Ready to complete section, review the configuration summary and click Finish.
-
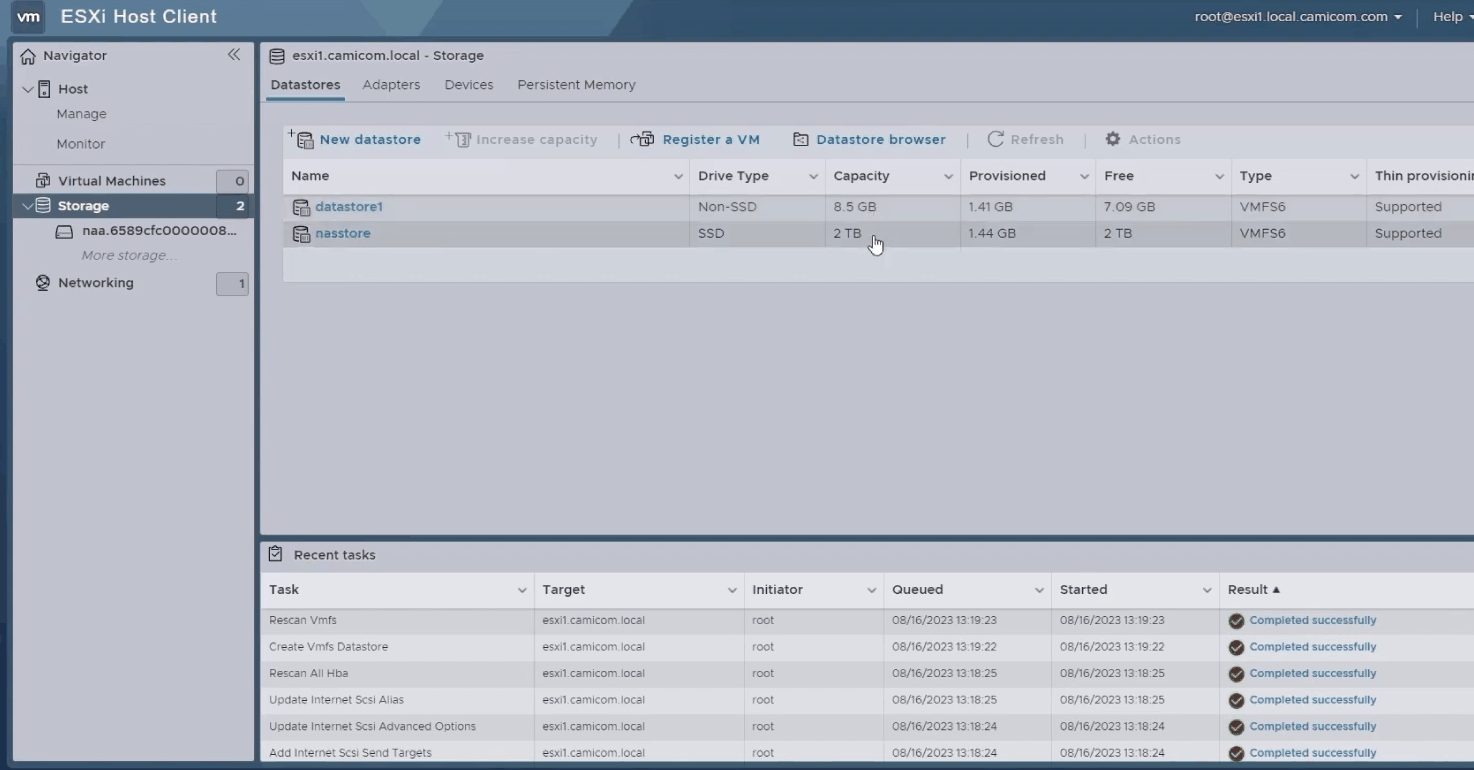
You should now see the iSCSI storage listed in Storage > Datastores.
Step 3: Install VMware vSphere to Manage the VMware Cluster
Install vSphere using the configuration utility.
The installation is performed in two stages – the setup wizard will guide you through the steps necessary to complete the installation procedure.
Installation: Stage 1
-
When the utility starts, select Install.
Read the Introduction section and click Next.
-
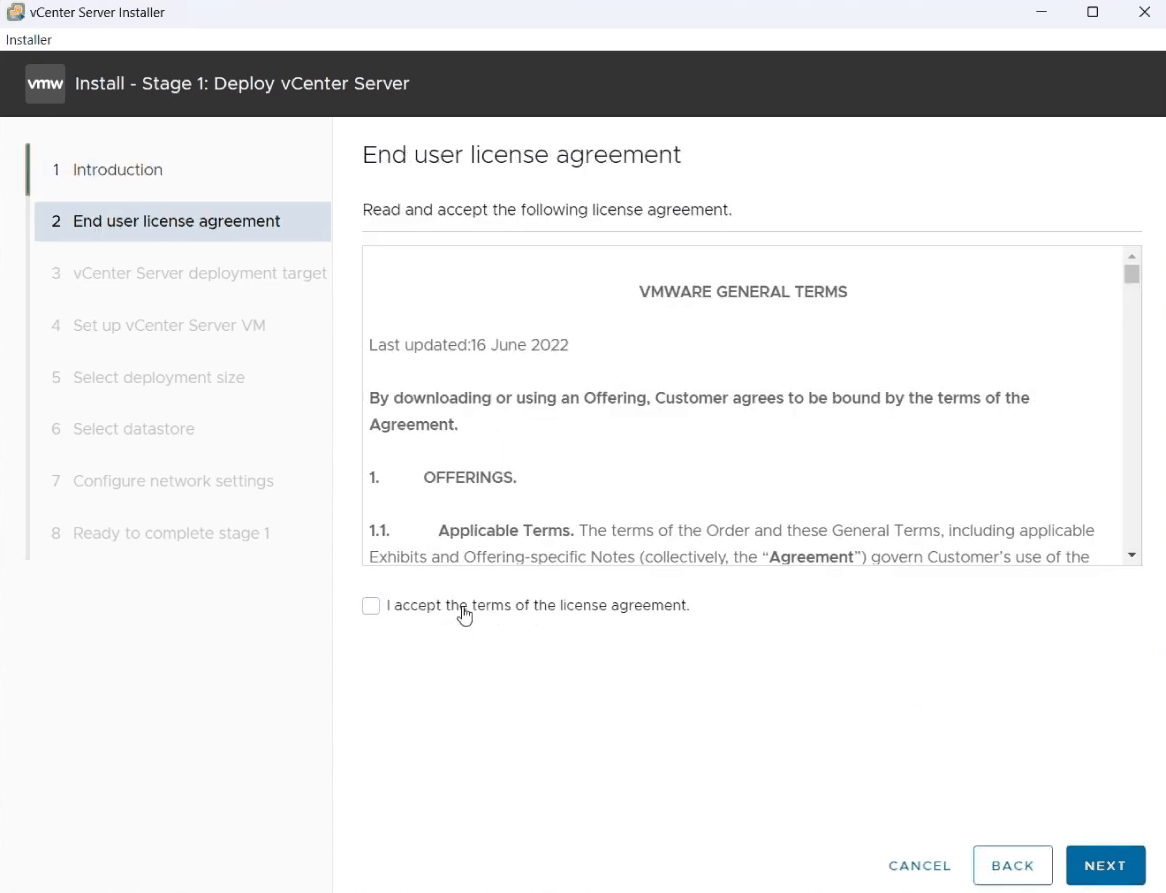
Read and accept the terms of the license agreement. Click Next.
-
In the vCenter Server deployment target section, provide the IP address of your ESXi host, HTTPS port, root user name, and password.
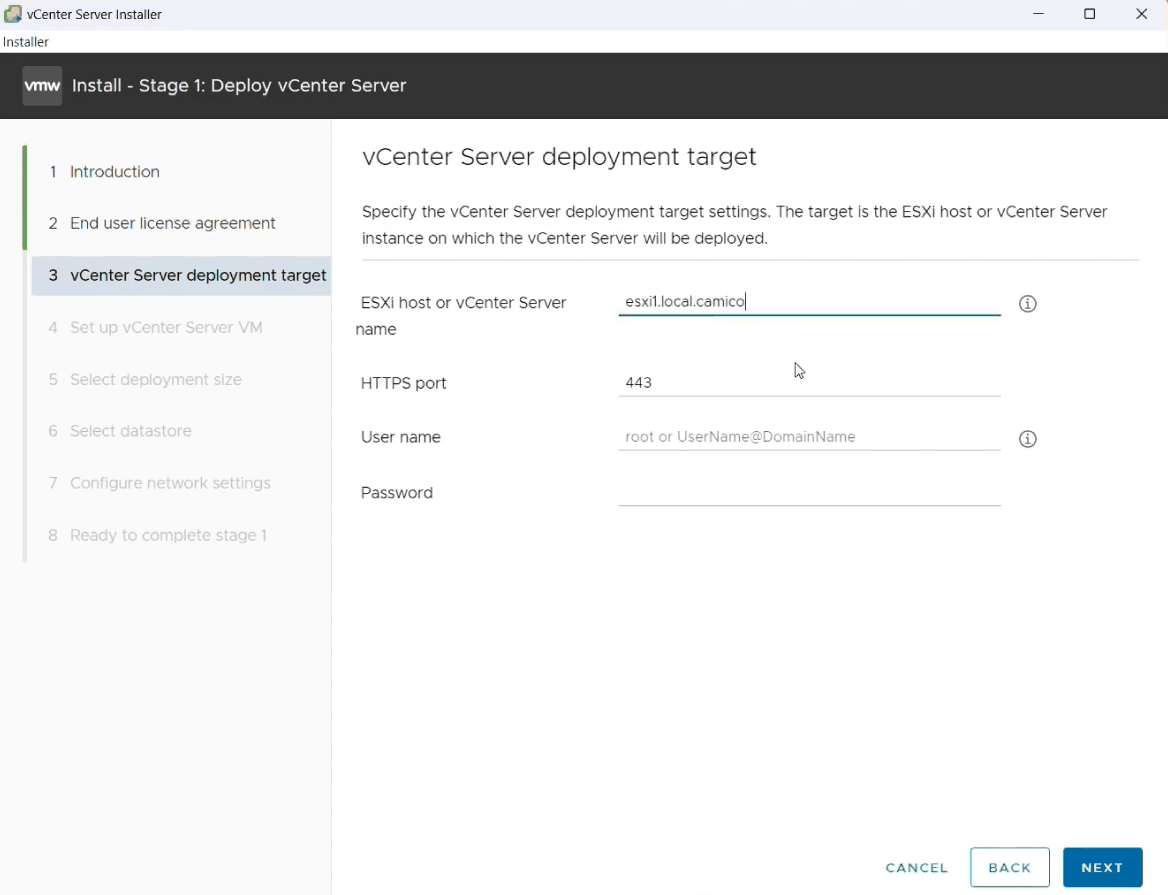
Click Next.
-
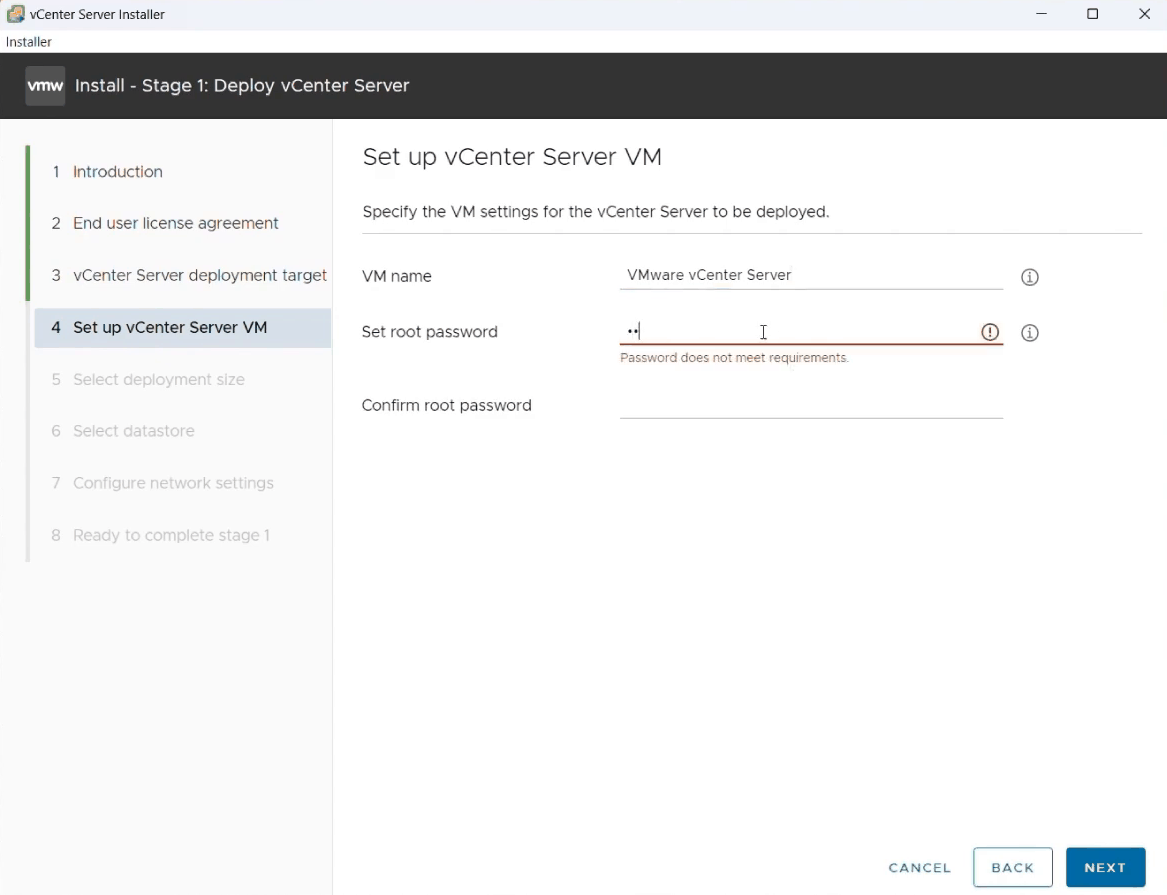
In the Set up vCenter Server VM section, specify the name for your vSphere virtual machine and set a password for the root user.
-
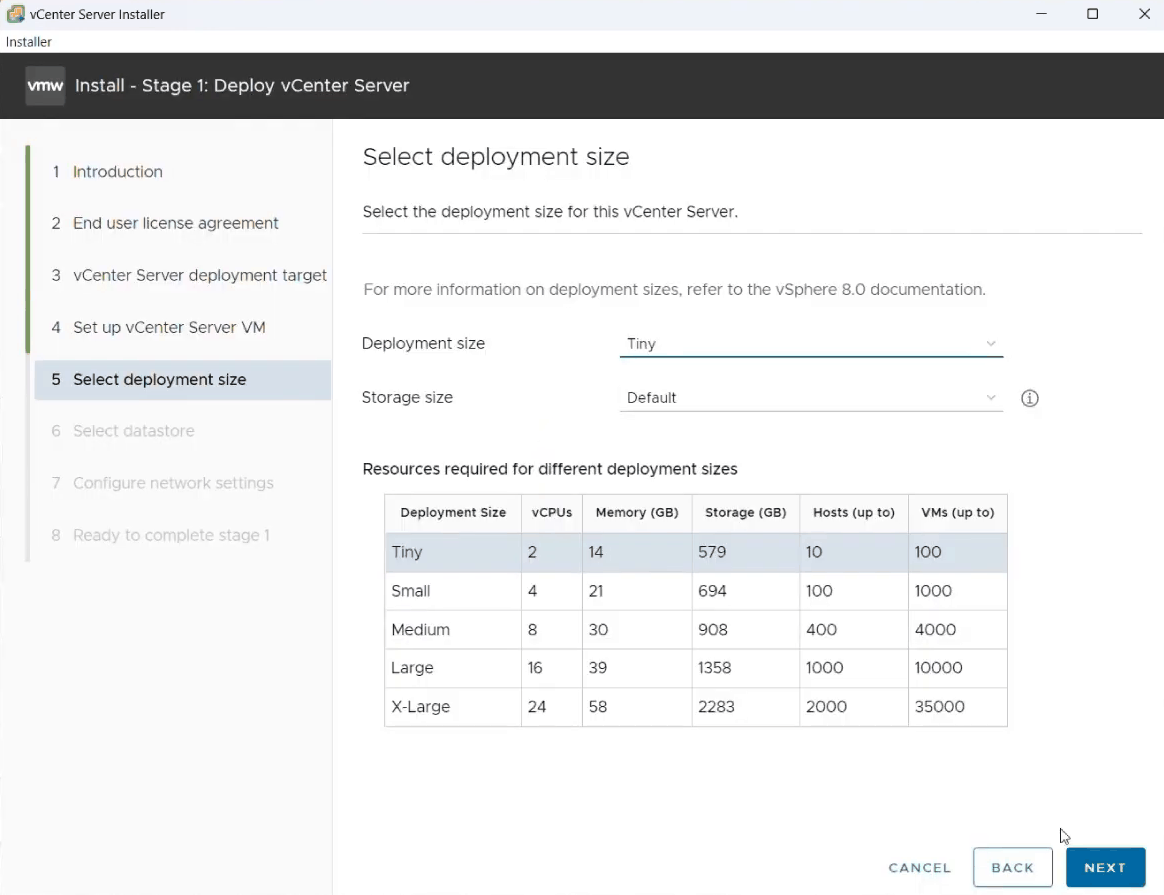
In the Set deployment size section, select the values that suit your environment needs.
-
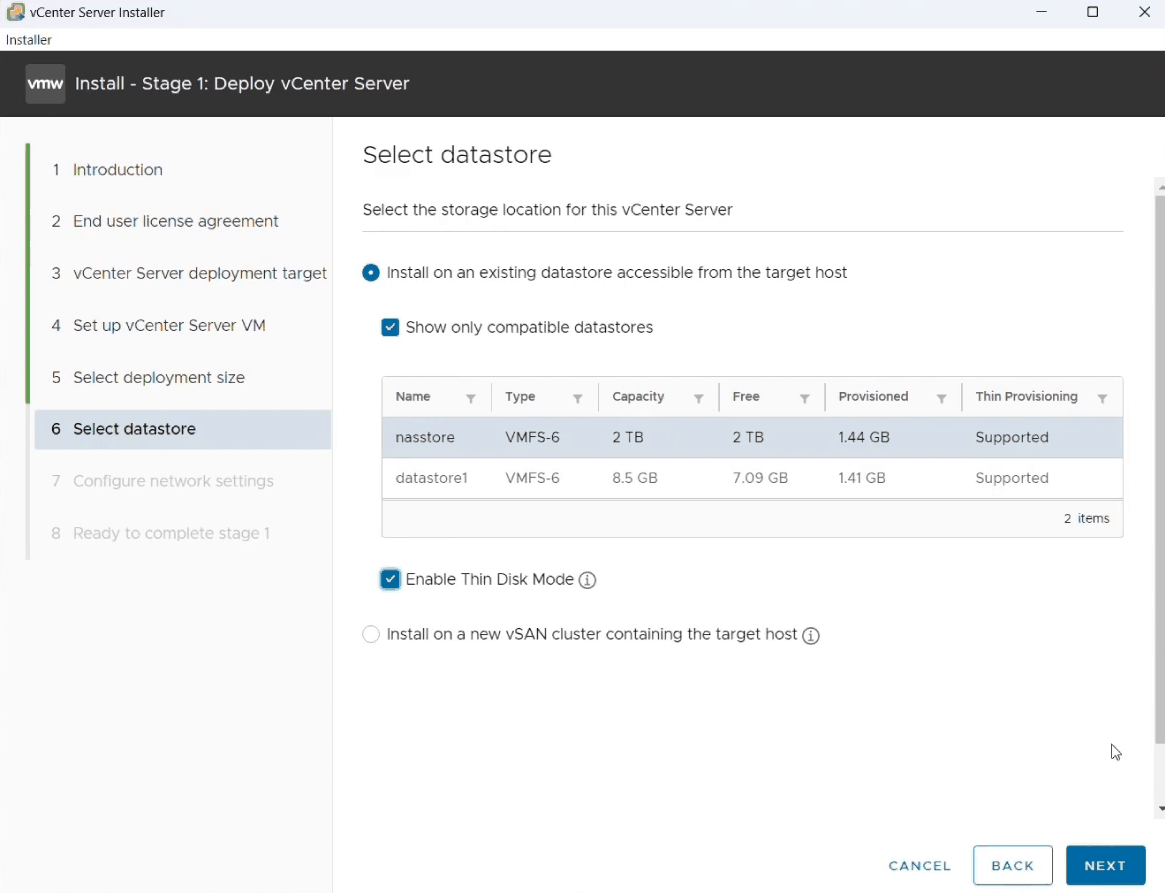
In the Select datastore section, select the datastore that you created earlier in Step 2.
Select Enable Thin Disk Mode and click Next.
-
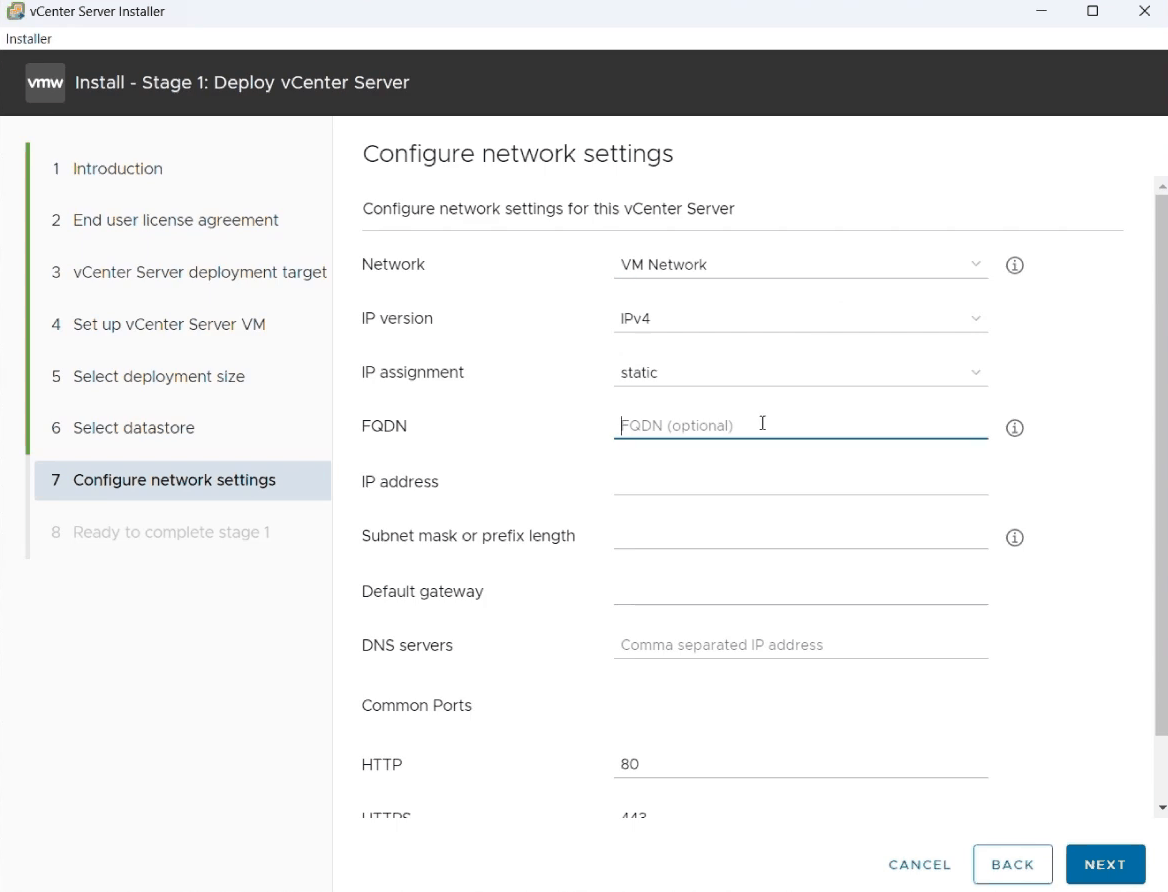
In the Configure network settings section, provide networking details for your vSphere Server.
-
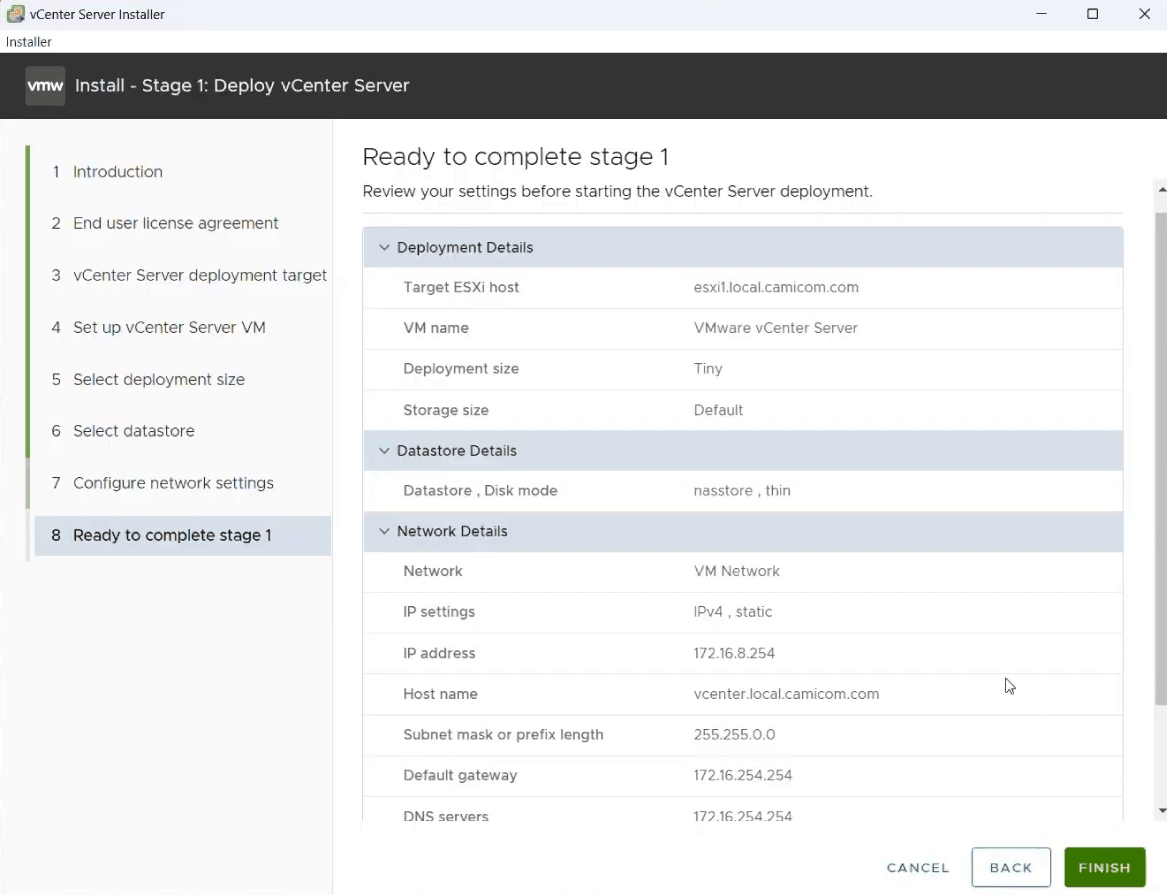
In the Ready to complete stage 1 section, review the configuration parameters. Click Back to edit the configuration; click Finish to complete the configuration.
-
The installation procedure Stage 1: Deploy vCenter Server will now create a new virtual machine running on your ESXi host.
Installation: Stage 2
-
When you see a message about having successfully deployed the vCenter Server, click Continue.
-
In the Introduction section, click Next.
-
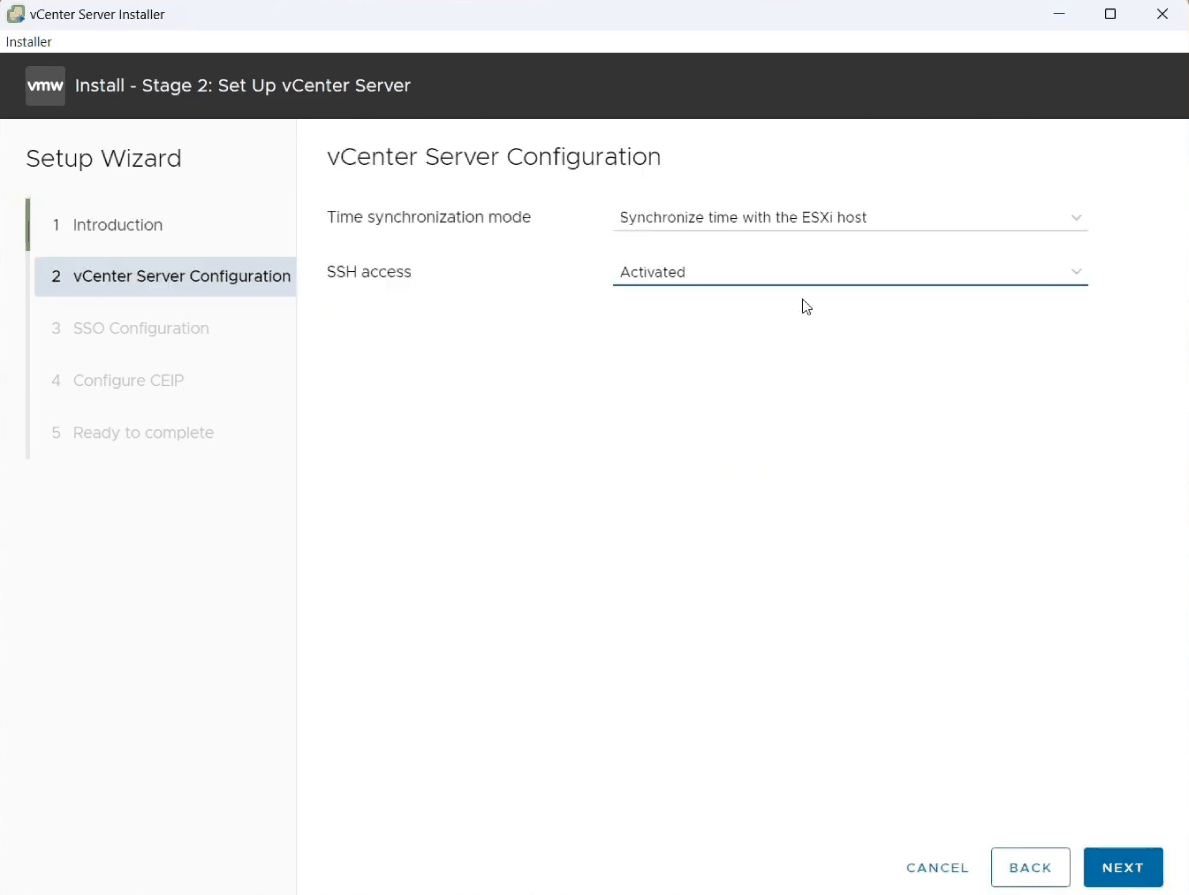
In the vCenter Server Configuration section, select the following values:
- Time synchronization mode: Synchronize time with the ESXi host
- SSH access: Activated
Click Next.
-
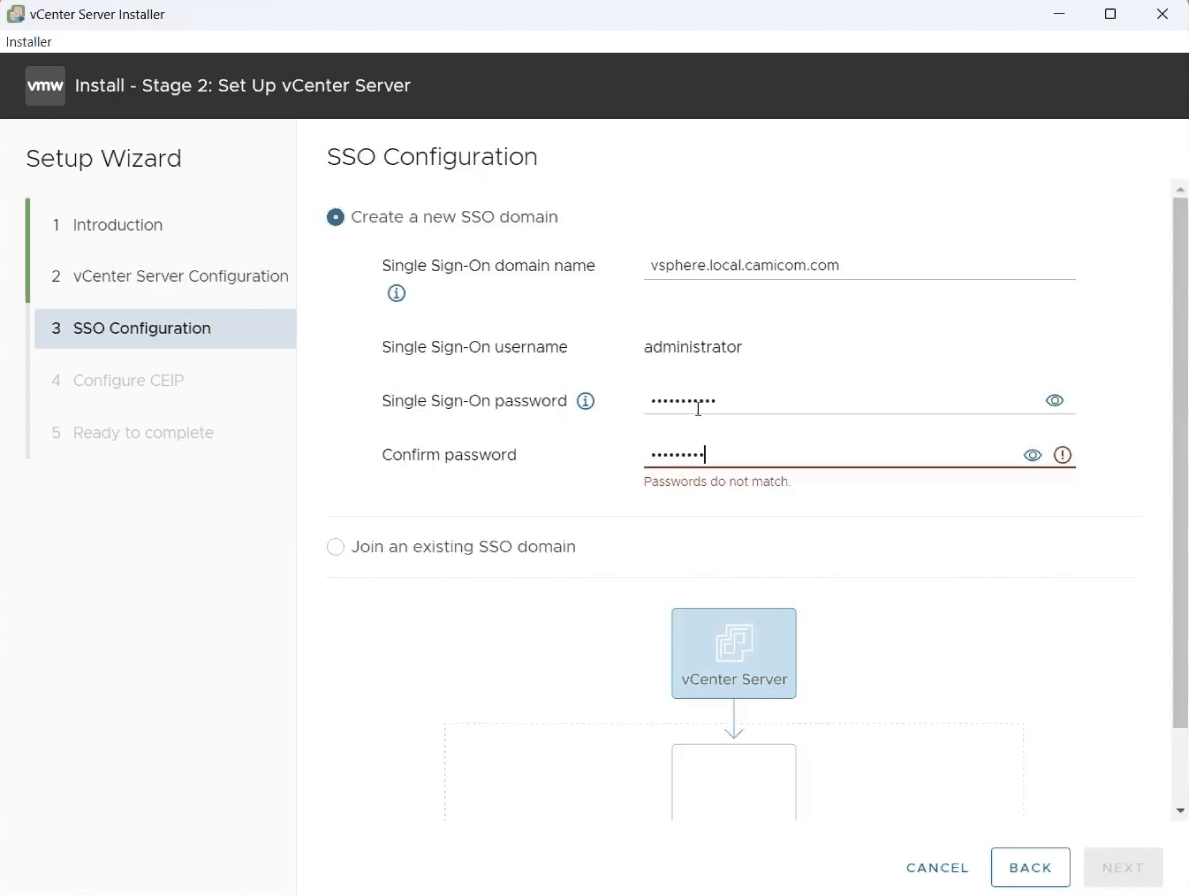
In the SSO Configuration section, specify the Single Sign-On (SSO) domain name, username, and password. You will use this username and password to log in to vSphere later.
Click Next.
-
In the Configure CEIP section, review the information and click Next.
-
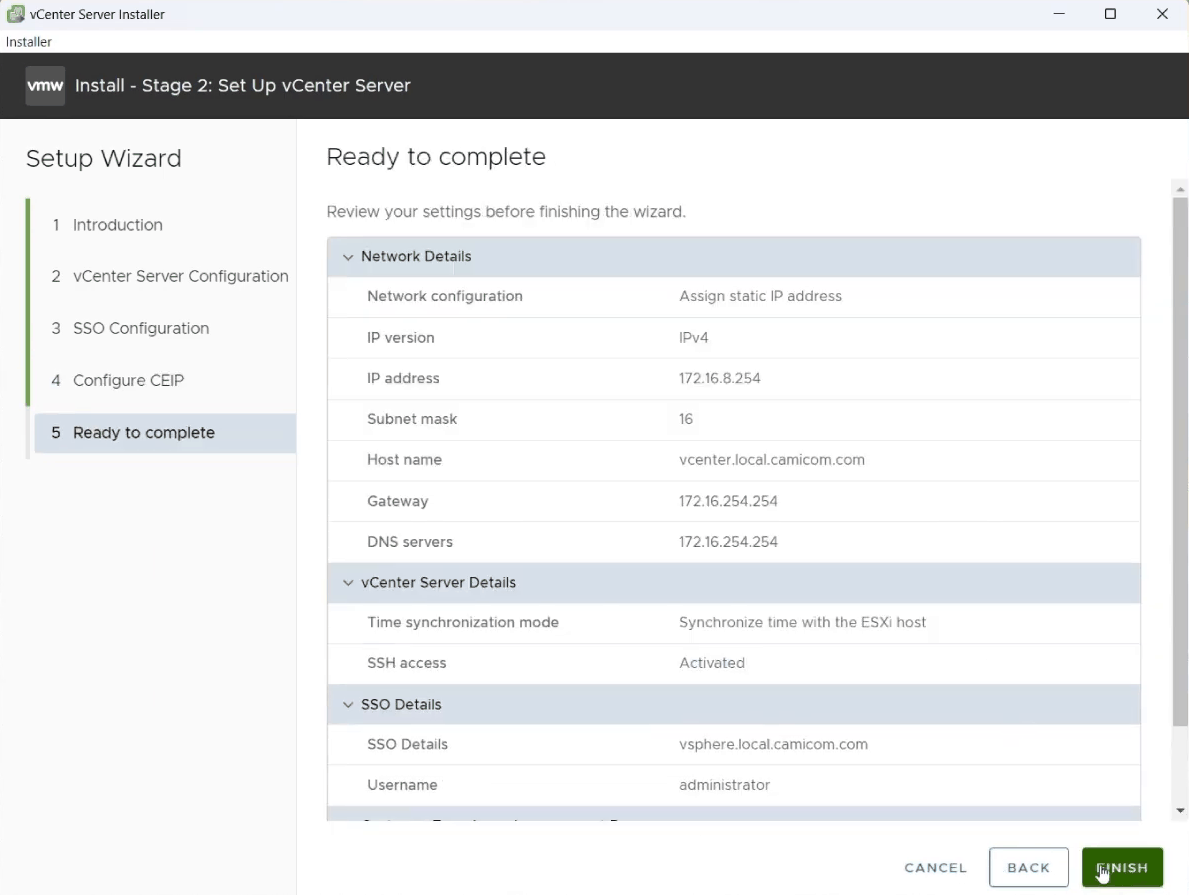
On the Ready to complete section, review the configuration parameters. Click Back to edit the configuration; click Finish to complete the configuration.
Step 4: Create a VMware Cluster and Add Hosts
-
Log in to the VMware vSphere client using the username and password you created earlier.
-
Click Actions > New Datacenter. Type the name for the Datacenter and click OK.
-
In the left pane, click on the created Datacenter, then click Actions > New Cluster. The New Cluster wizard will open.
-
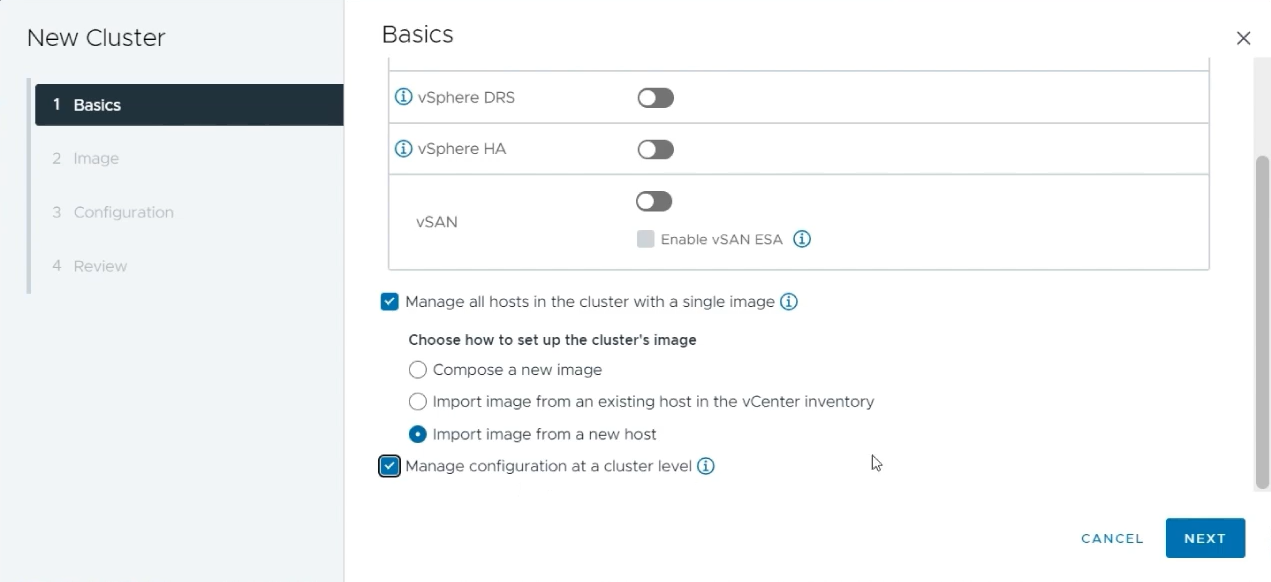
In the Basics section:
- Enter a name for your cluster.
- Select the Manage all hosts in the cluster with a single image checkbox.
- Choose Import image from a new host from the menu.
- Select the Manage configuration at a cluster level checkbox.
Click Next.
-
In the Image section, specify the host IP where you are running the ESXi vCenter Server instance along with the root user credentials. Click Next.
-
The Configuration section may or may not contain any details, you can safely click Next.
-
In the Review section, check the cluster configuration. Click Back to edit the parameters; click Finish to complete the configuration.
Adding Hosts
-
In the left pane of the vSphere Client, click the cluster icon (
 ). Keep expanding the vCenter instance menu until you see the cluster you have just created. Click on the cluster name, then click the Actions button in the right pane and select Add Hosts. The Add hosts wizard will open.
 -
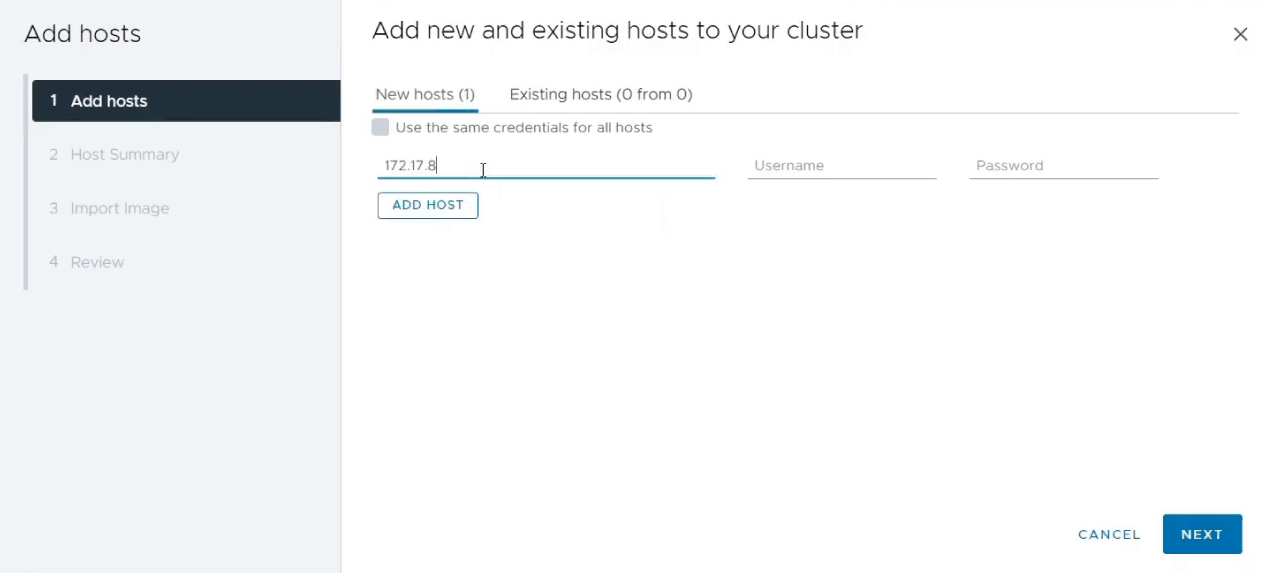
In the Add hosts section, specify the IP address for the second ESXi server and the root username and password. Click Next.
Note
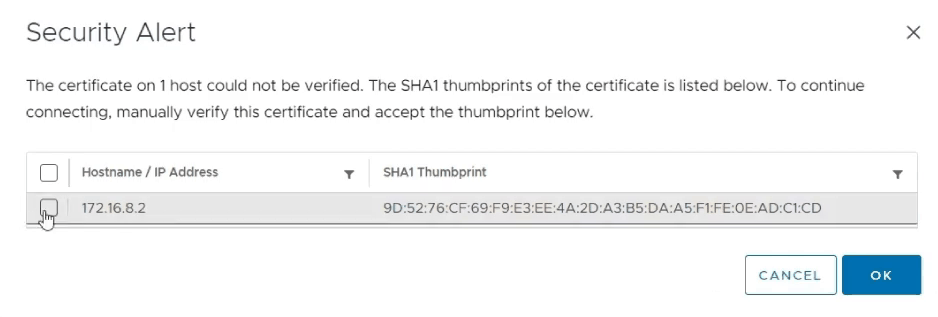
vSphere may show a Security Alert about the new host's certificate not being verifiable. Verify the SHA1 thumbprint and click OK to accept it and continue.
-
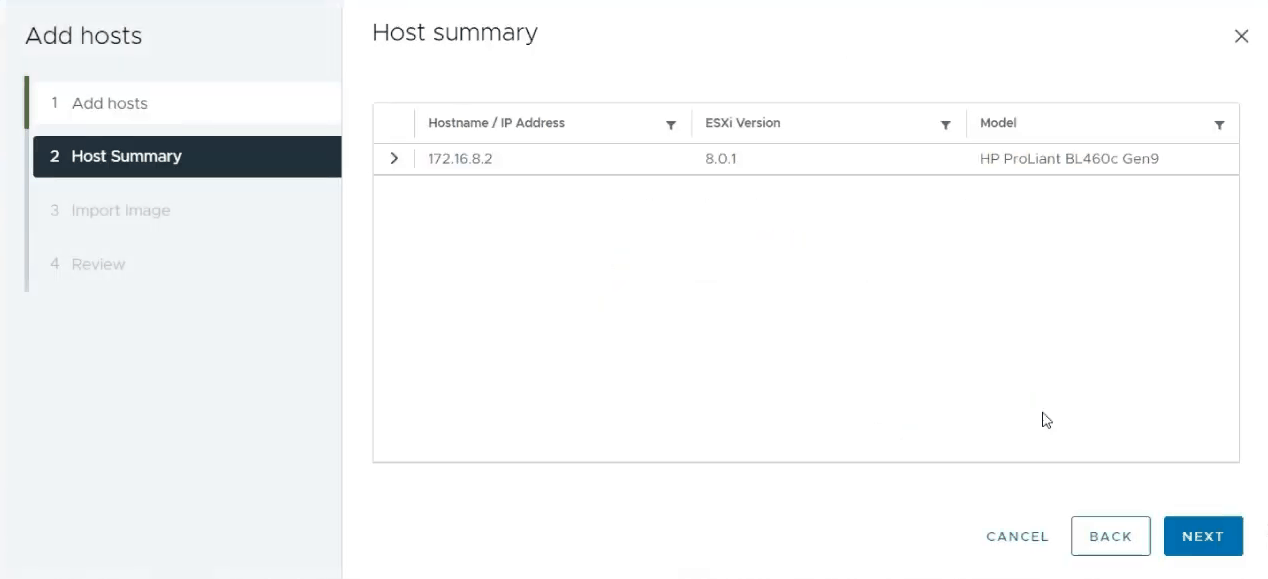
In the Host Summary section, you will see the details of the host you have just added. Click Next.
-
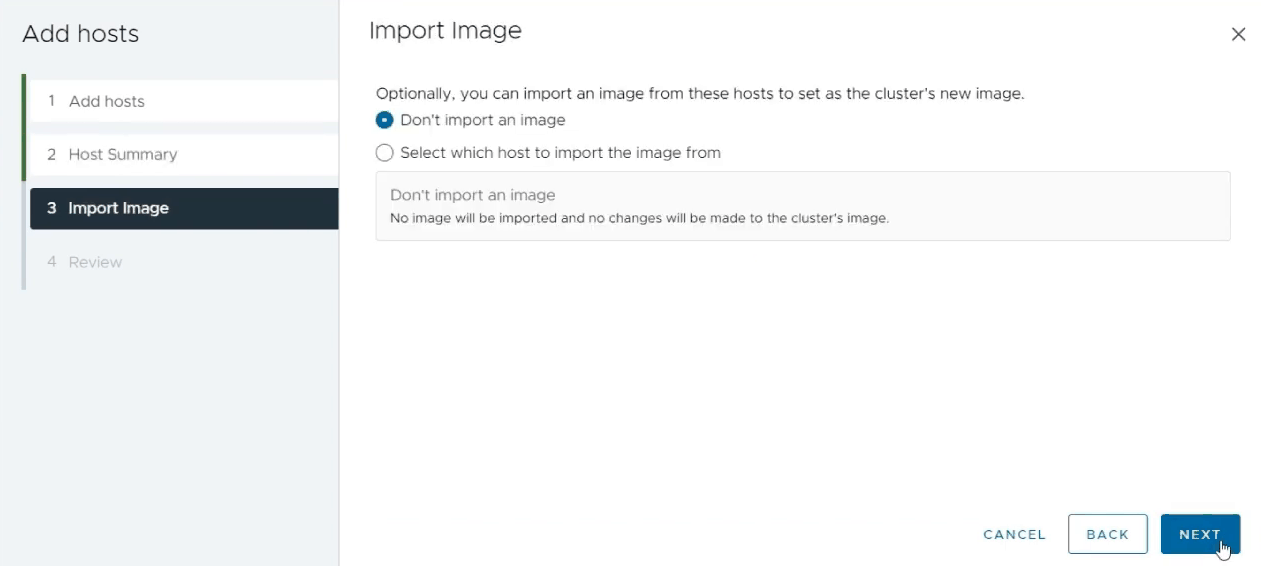
In the Import Image section, select Don't import an image, then click Next.
-
In the Review section, review the host IP that will be connected to the vCenter Server and moved to the cluster. Click Finish.
-
You will see the new host added to the cluster menu in the left pane.
Connecting the Hosts to the iSCSI Storage
-
In the left pane of the vSphere Client, click on the host you have just added in the Adding hosts section. Click Configure > Storage Adapters.
-
Click Add Software Adapter and select Add iSCSI adapter.
-
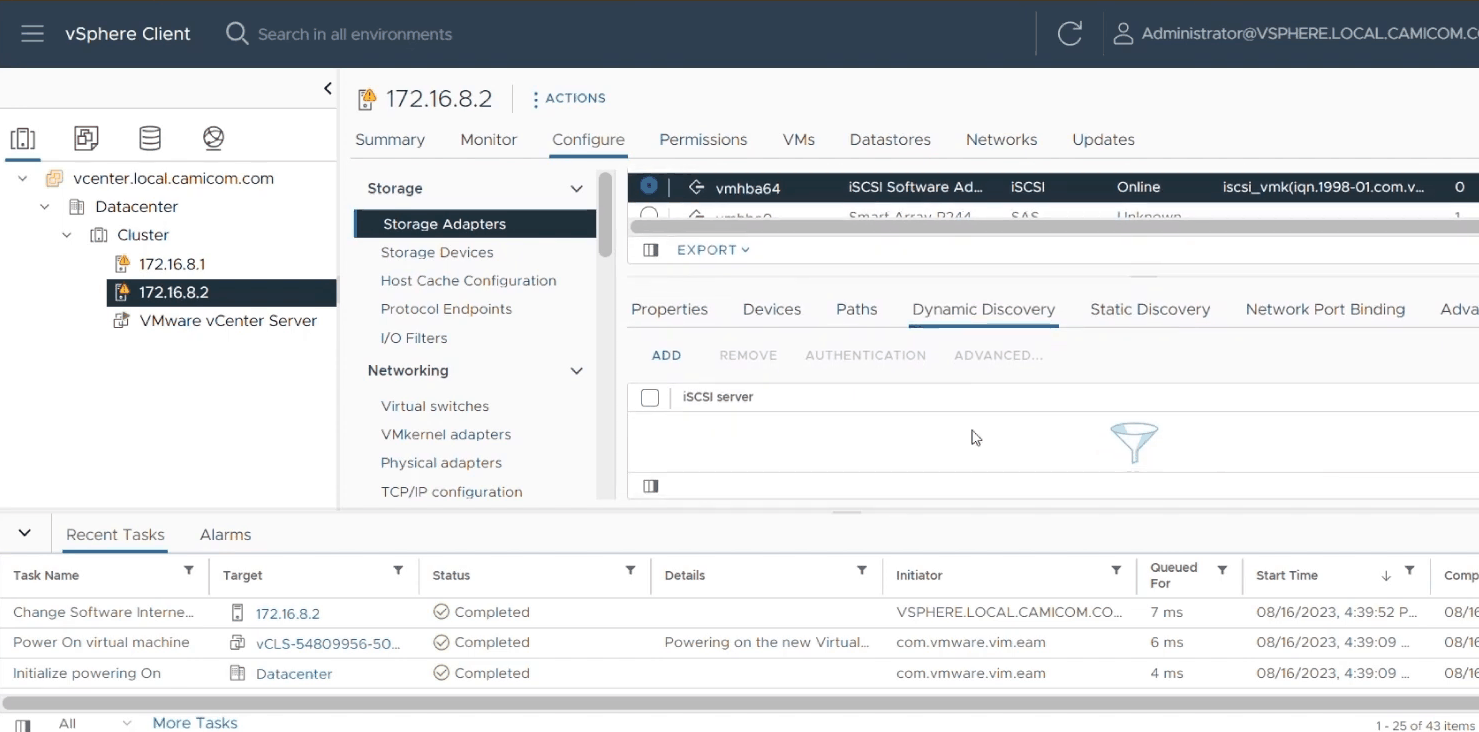
Click on the new iSCSI adapter on the list of adapters, then click Dynamic Discovery > ADD.
-
Specify the iSCSI Server IP and port. Make sure that the Inherit authentication settings from parent checkbox is selected and click OK.
-
Click the Rescan storage button and select Scan for new storage devices and Scan for new VMFS volumes. Click OK. The datastore you created in Step 2 should now appear on this host as well.
-
You will now be able to access the iSCSI storage from both ESXi hosts.
Step 5: Setting Up Networking
-
In the left pane of the vSphere Client, click on the Datacenter. Click the Actions button and select Distributed Switch > New Distributed Switch. The New Distributed Switch wizard will open.
-
In the Name and location section, enter the name for the distributed switch. Click Next.
-
In the Select version section, select your version of VMware ESXi. Click Next.
-
In the Configure settings section, specify the parameters that correspond to your environment needs or use the default values. Click Next.
-
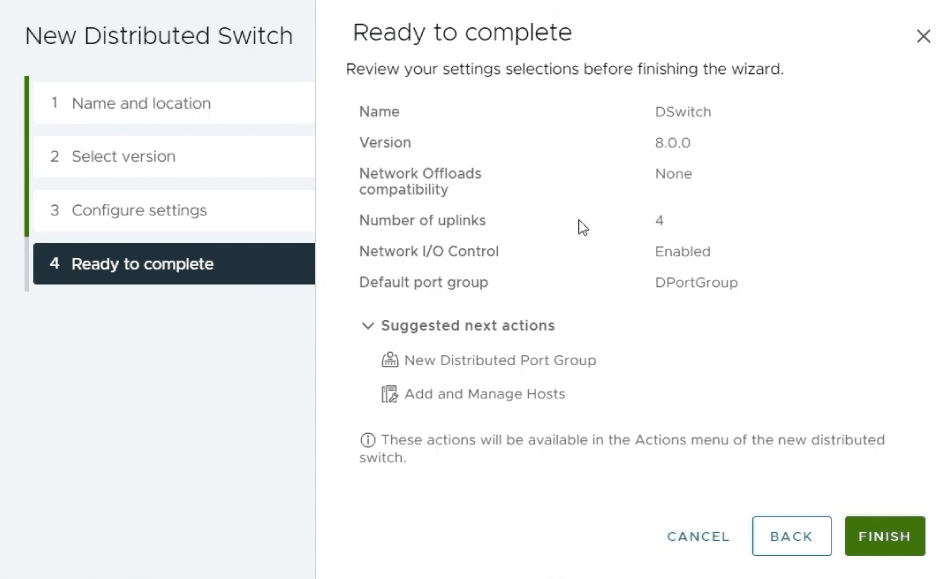
In the Ready to complete section, review the new distributed switch settings. Click Back to edit the parameters; click Finish to complete the configuration.
-
In the left pane, select the newly created distributed switch. Click the Actions button and select Add and Manage Hosts. The Add and Manage Hosts wizard will open.
- In the Select task section, select Add hosts. Click Next.
- In the Select hosts section, click New hosts, select both ESXi hosts in the cluster, click OK, then click Next.
-
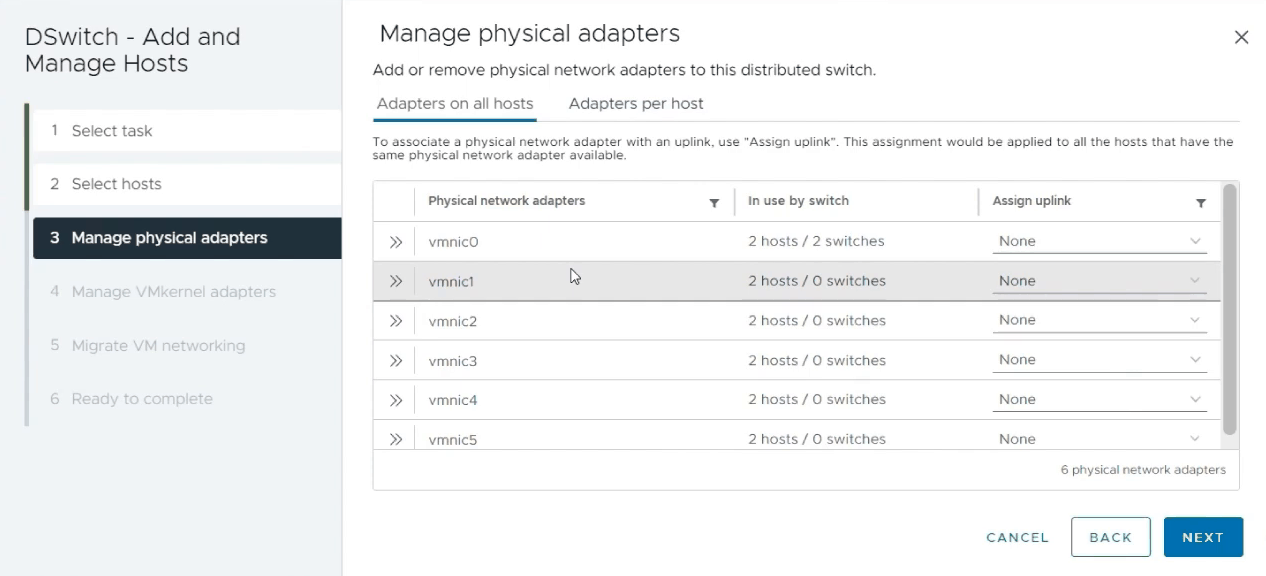
In the Manage physical adapters section, assign two physical NICs per host to the distributed switch. Click Next.
-
In the Manage VMkernel adapters section, accept the defaults. Click Next.
-
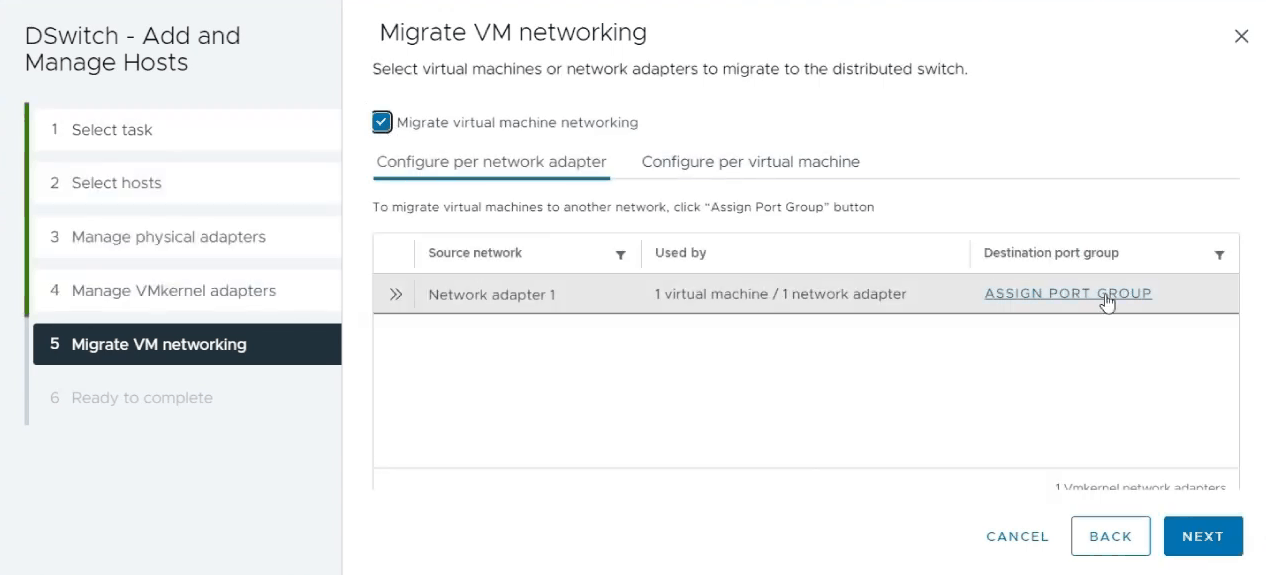
In the Migrate VM networking section, select the network adapters of your existing virtual machines and assign them to the distributed switch, so that these VMs keep their network connection when migrated between hosts. Click Next.
-
In the Ready to complete section, review the configuration summary and click Finish.
-
In the left pane, select the distributed switch. In the Hosts and VMs tabs, confirm that both ESXi hosts and the vCenter Server virtual machine are now connected to it. A virtual machine connected to this distributed switch will keep its network connection when it is vMotioned between hosts.
Creating a Dedicated Network for vMotion Traffic
vMotion traffic requires its own network connection, recommended to be a dedicated 10 Gbit (or faster) link, separate from the network(s) used for host management and guest traffic. Repeat the steps below on each ESXi host.
-
In the left pane of the vSphere Client, click on one of the ESXi hosts. On the right, click the Actions button and select Add Networking. The Add Networking wizard will open.
-
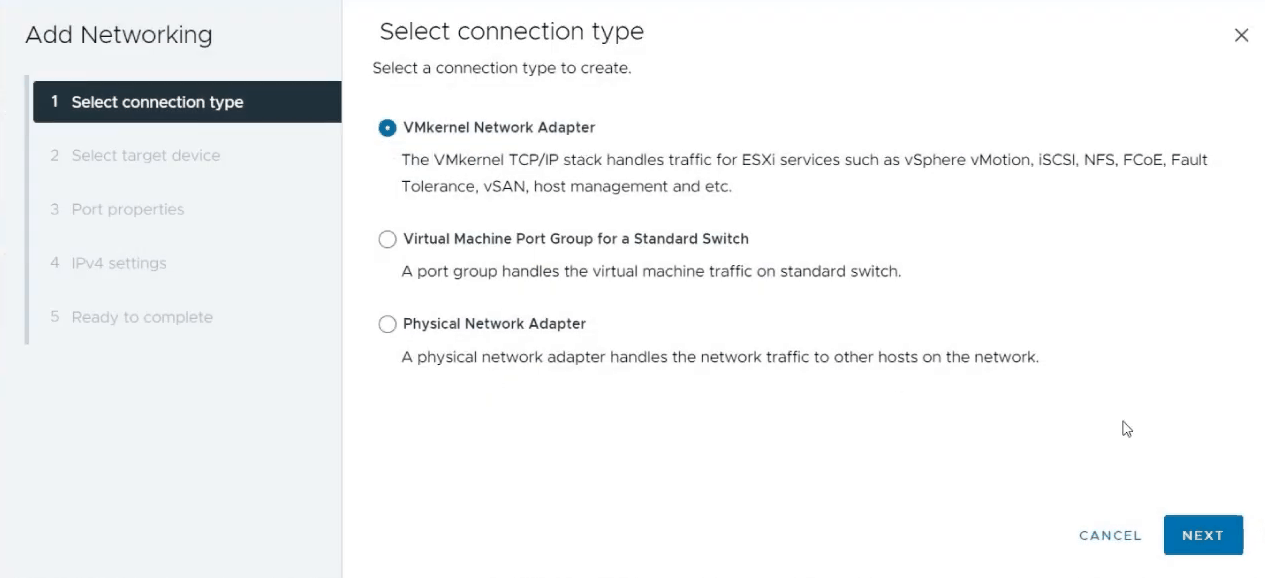
In the Select connection type section, select VMkernel Network Adapter. Click Next.
-
In the Select target device section, select New standard switch and click Next.
-
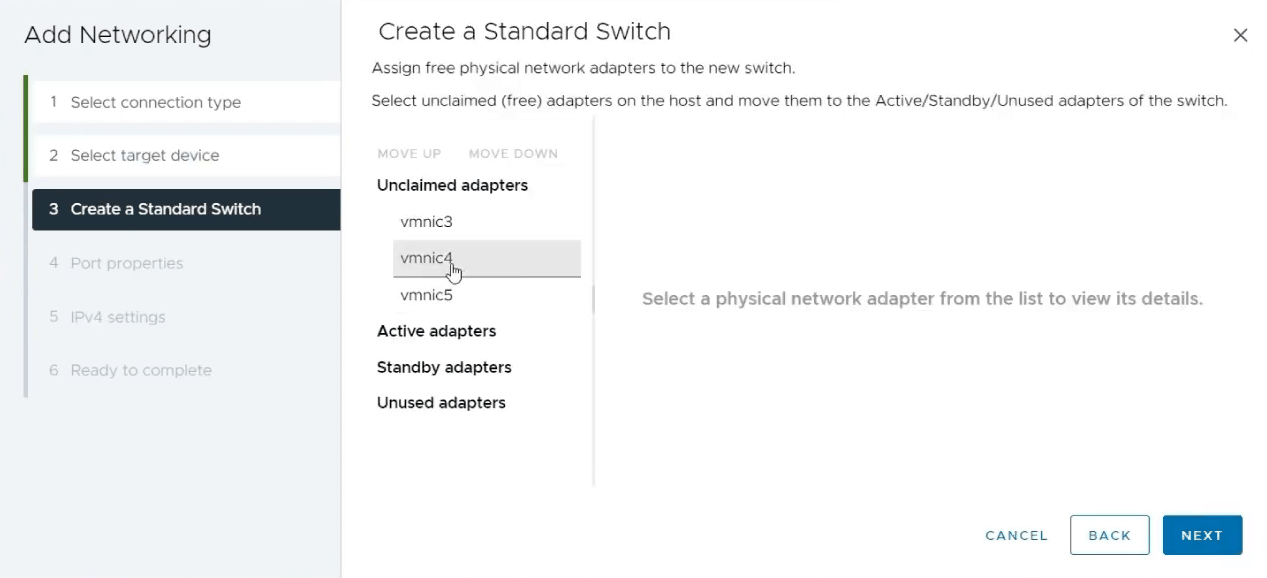
In the Create a standard switch section, add two physical network adapters to it: mark one as Active and the other as Standby. This gives the vMotion network a failover path if the active adapter fails. Click Next.
-
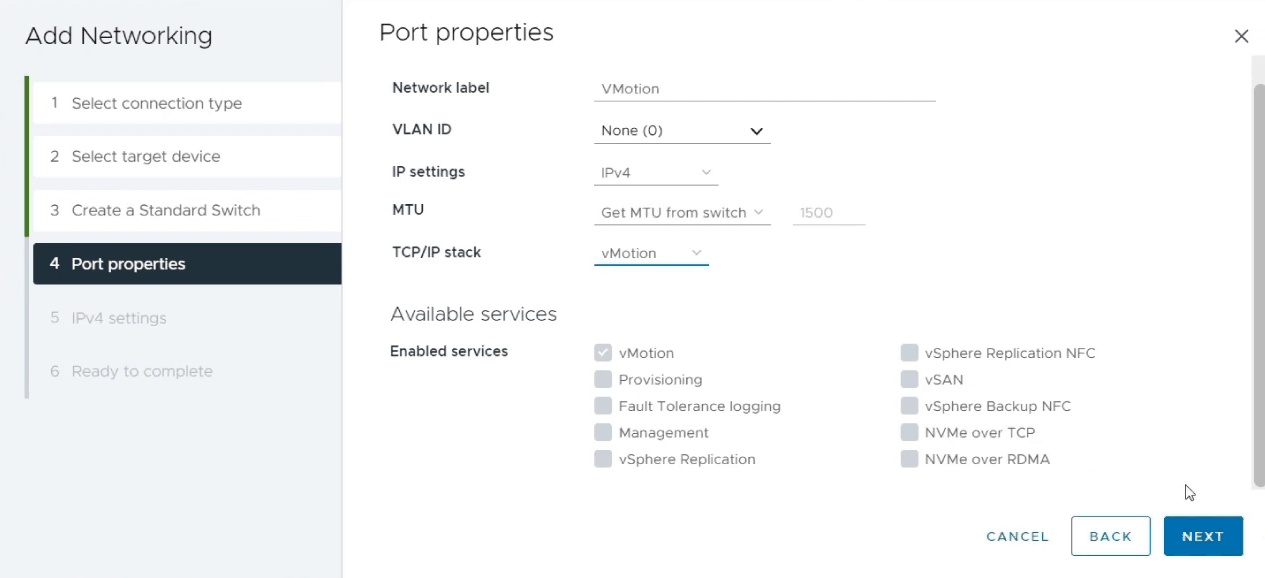
In the Port properties section:
- In the Network label field, enter a network name, e.g. VMotion.
- For TCP/IP stack, select vMotion – this stack is optimized specifically for vMotion traffic.
- Select the vMotion service checkbox.
Click Next.
-
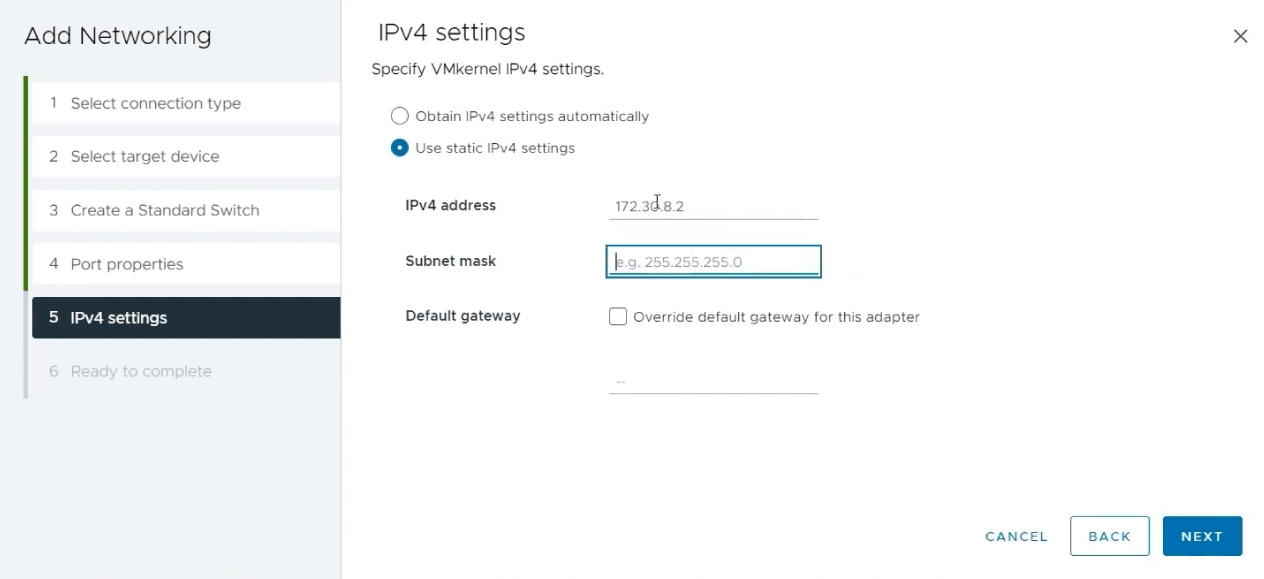
In the IPv4 settings section, enter a static IP address and subnet mask for this host on a dedicated vMotion subnet. This subnet must be completely separate from your management and guest networks. Click Next.
-
In the Ready to complete section, review the configuration summary and click Finish.
Repeat this procedure on the remaining ESXi host, assigning it a static IP address on the same vMotion subnet.
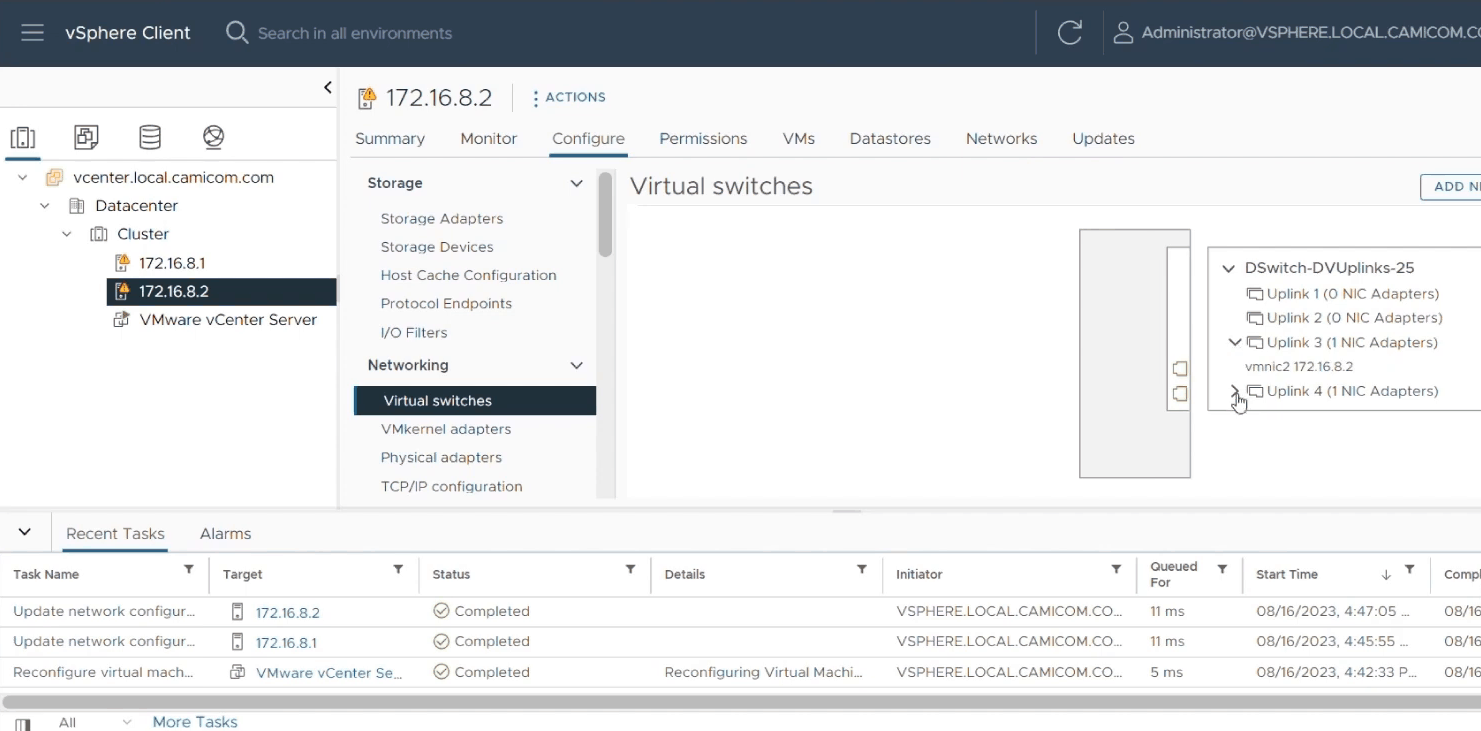
Once done, click Configure > Virtual switches on each host to confirm you now have three virtual switches:
- The distributed switch, used for virtual machine network traffic.
- vSwitch0, used for the management network and iSCSI traffic.
- vSwitch1, used for vMotion traffic.
Step 6 (optional): Verify That vMotion Works
Before installing the OpenVMS guest, verify that vMotion is functioning correctly by migrating the vCenter Server virtual machine between the two ESXi hosts.
-
In the left pane of the vSphere Client, right-click the vCenter Server virtual machine and select Migrate. The Migrate wizard will open.
-
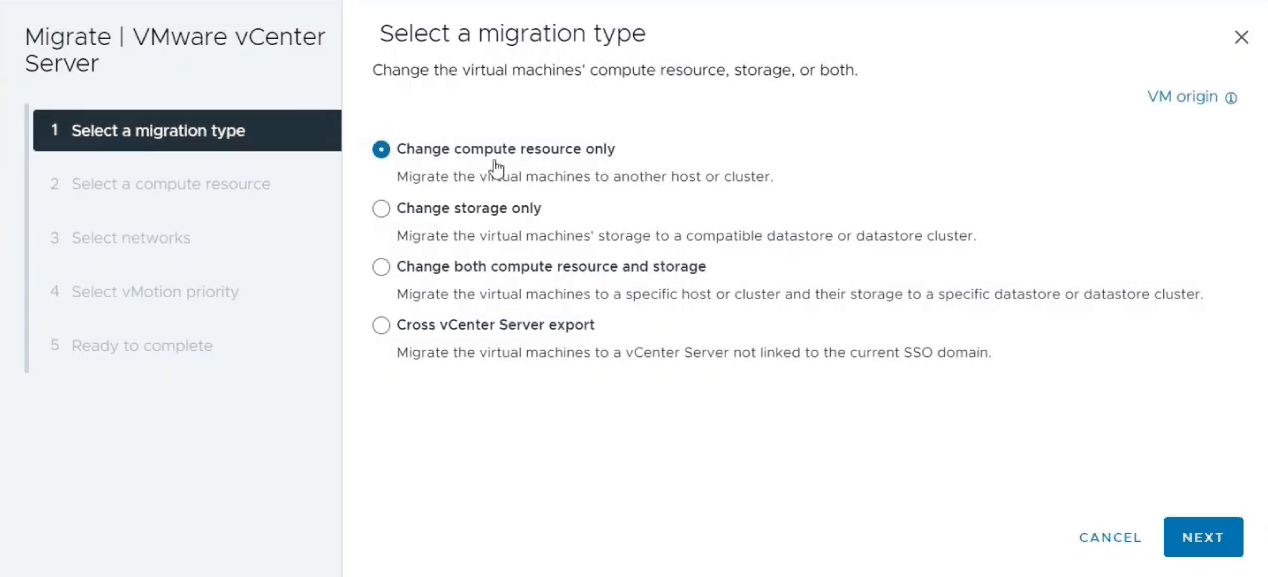
In the Select the migration type section, select Change compute resource only. Click Next.
-
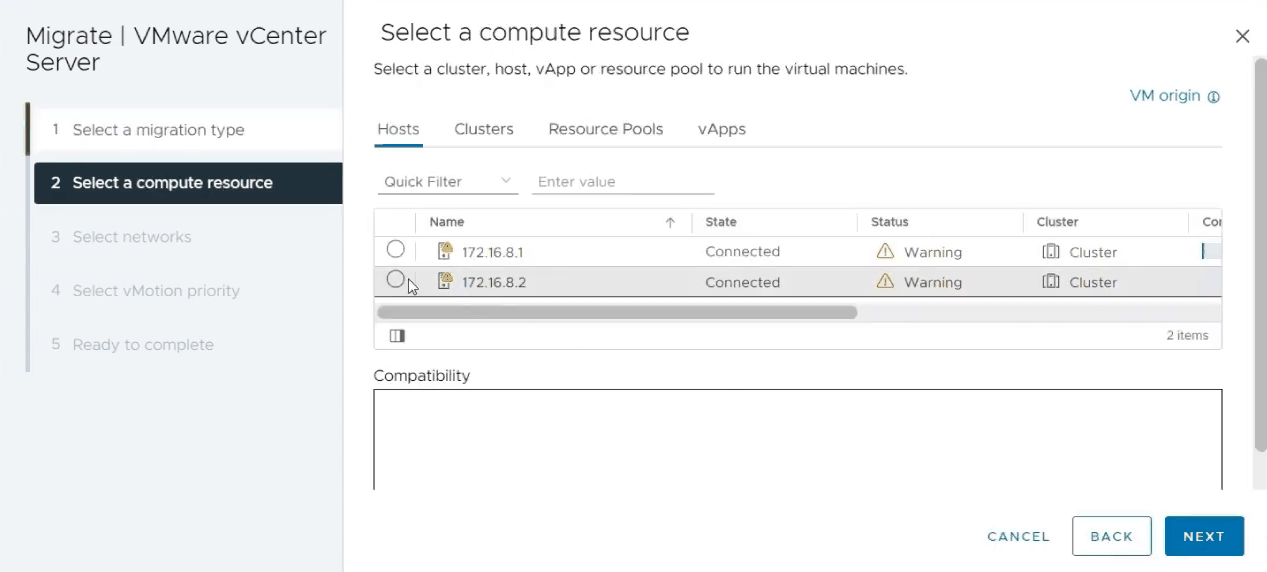
In the Select a compute resource section, select the other ESXi host in the cluster. Click Next.
-
In the Select vMotion priority section, select Schedule vMotion with high priority (recommended). Click Next.
-
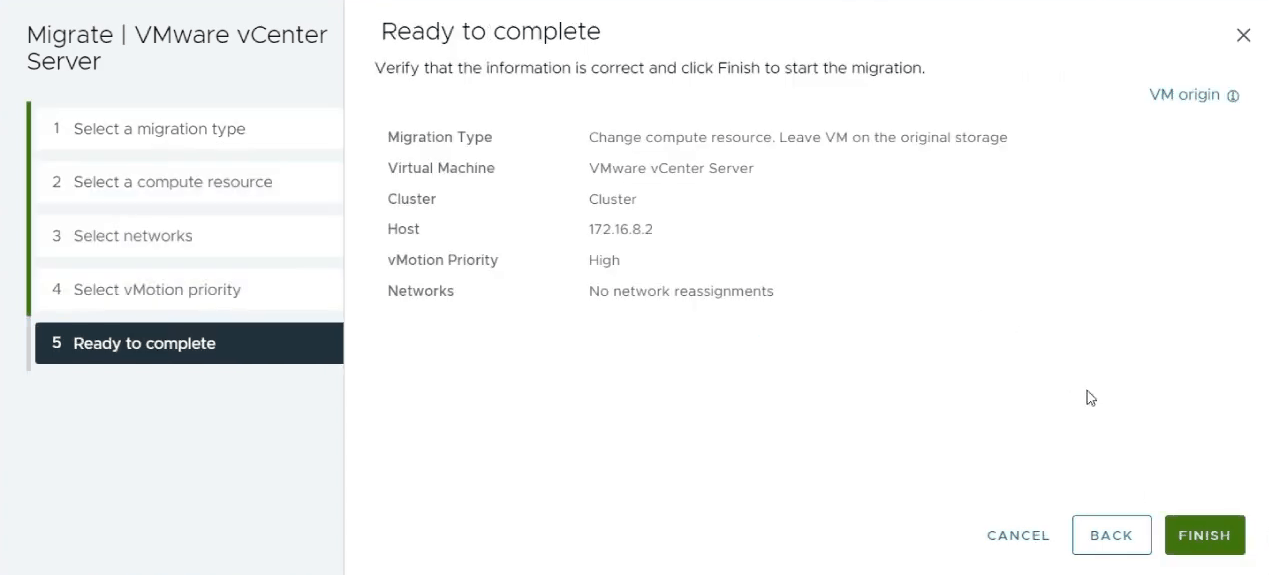
In the Ready to complete section, review the configuration summary and click Finish.
-
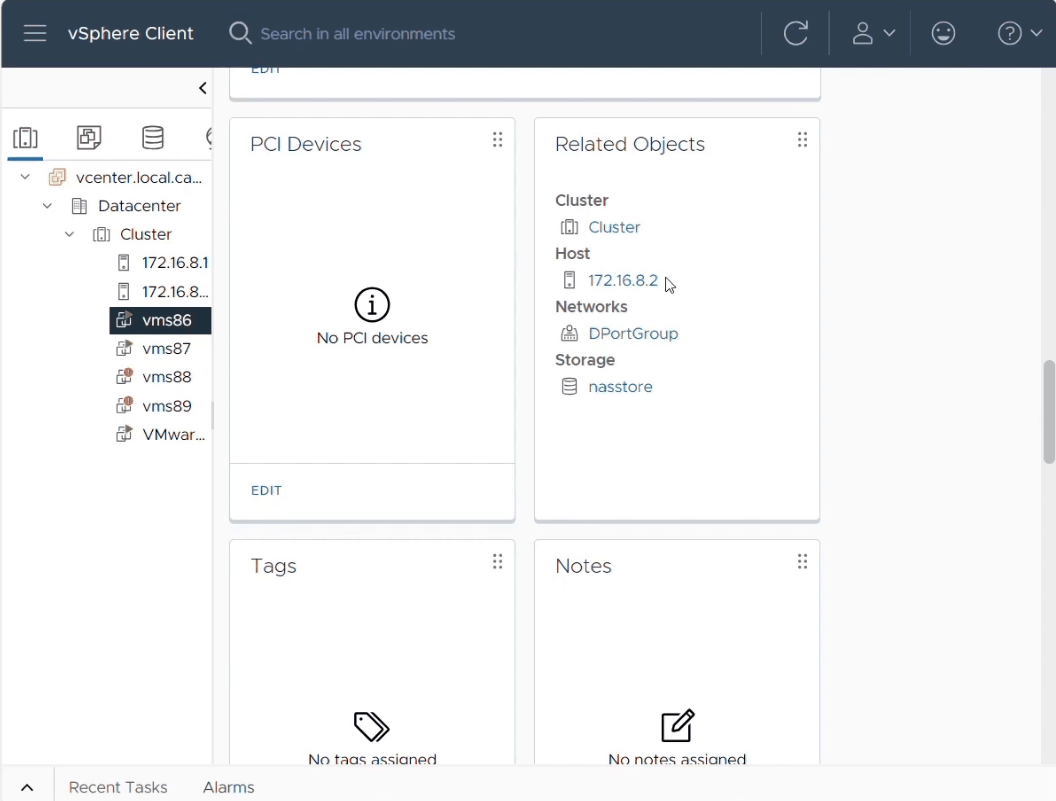
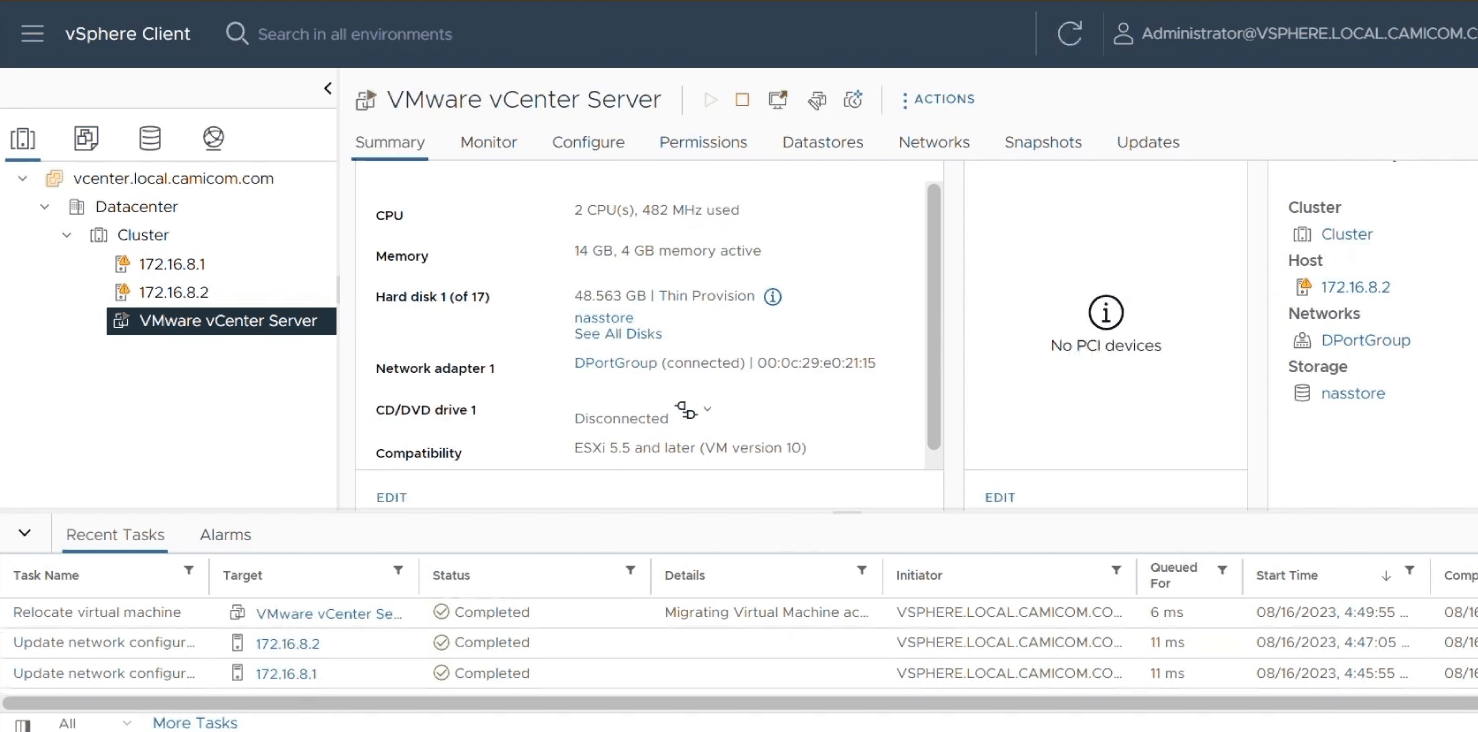
Click on the VMware vCenter Server virtual machine and check its IP address in the Summary tab. Once the migration completes, the IP address updates to reflect the host to which the virtual machine has moved, confirming that vMotion works correctly on this cluster.
Step 7: Create the OpenVMS x86-64 Virtual Machine
-
In the left pane of the vSphere Client, select the first ESXi host. Click Actions > New Virtual Machine. The New Virtual Machine wizard will open.
-
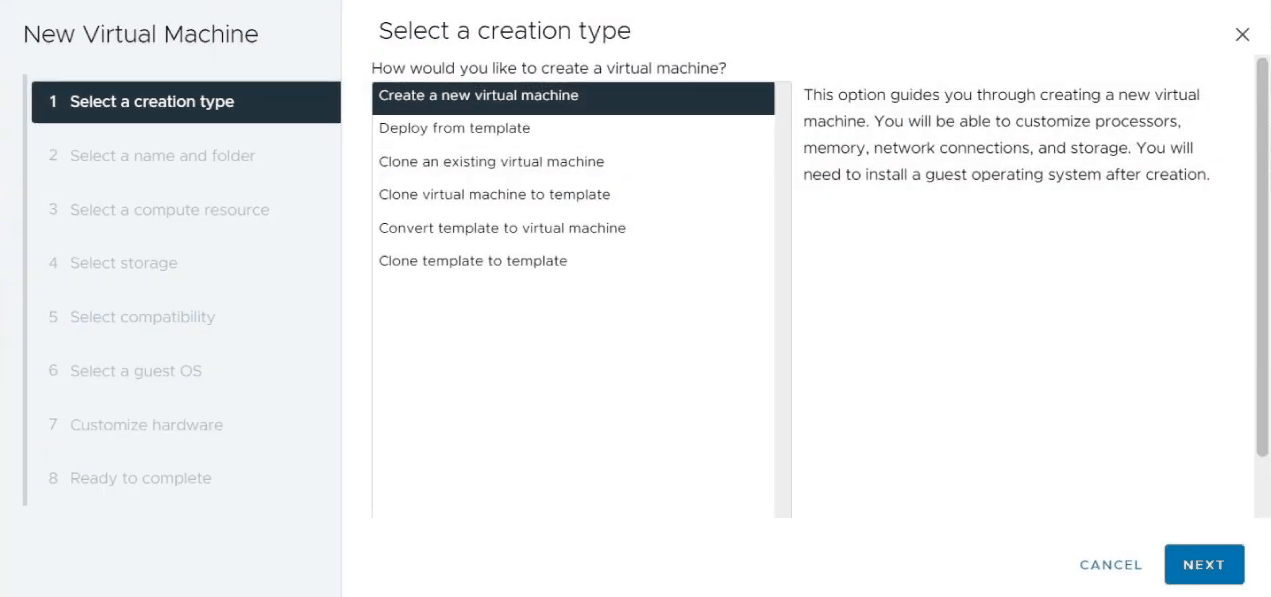
In the Select a creation type section, select Create a new virtual machine. Click Next.
-
In the Select a name and folder section, enter a name for the virtual machine. Click Next.
-
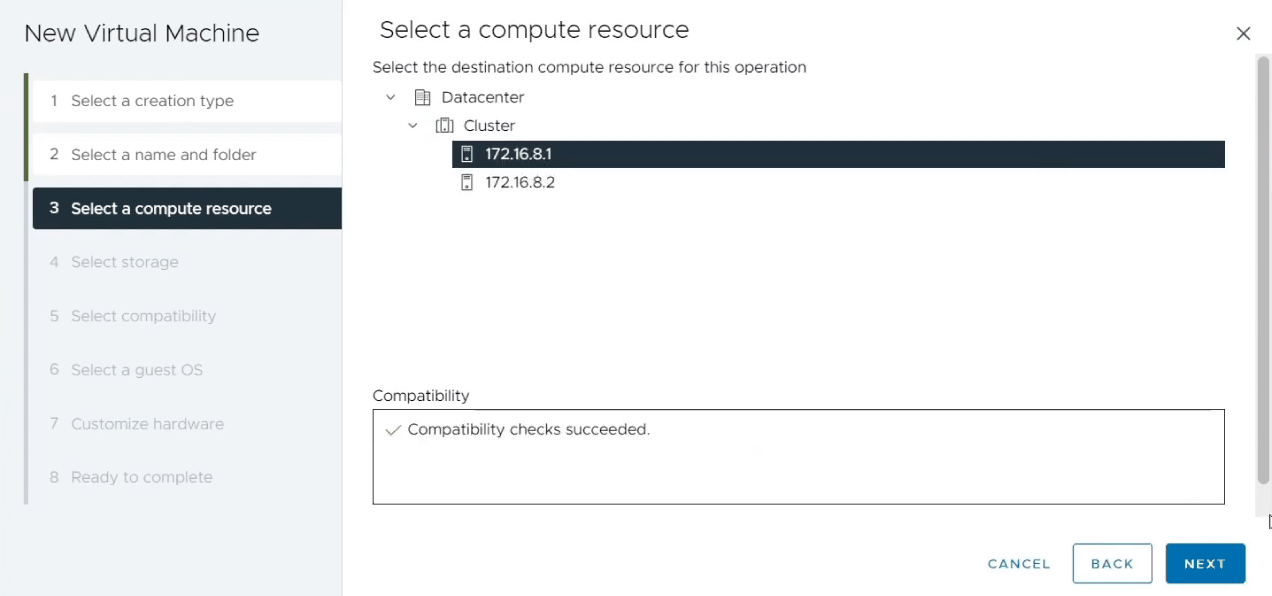
In the Select a compute resource section, select the ESXi host on which the virtual machine should initially run (you will move it to the other host later, using vMotion). Click Next.
-
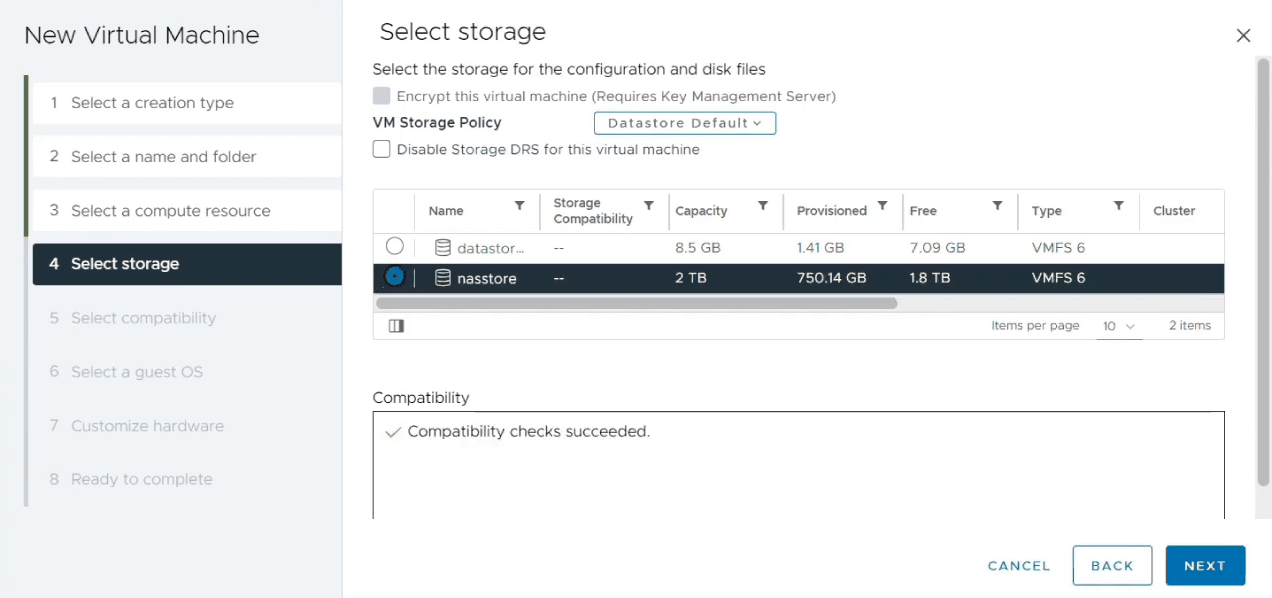
In the Select storage section, select the iSCSI datastore you created in Step 2. Click Next.
-
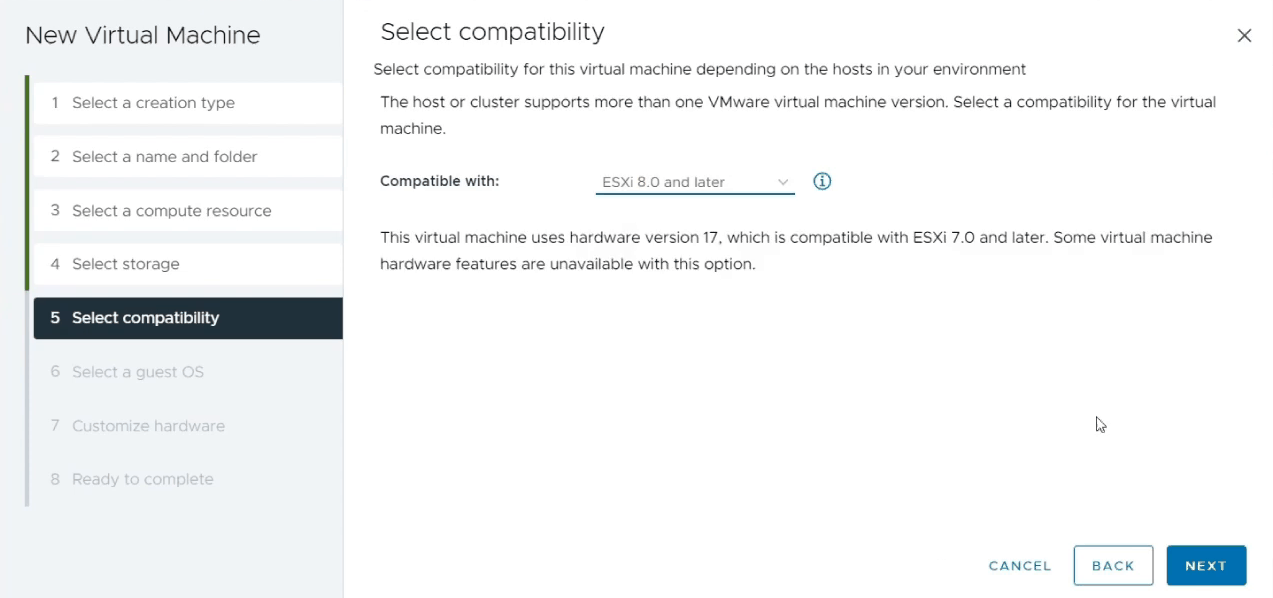
In the Select compatibility section, select ESXi 8.0 and later (or the compatibility level matching your ESXi version). Click Next.
-
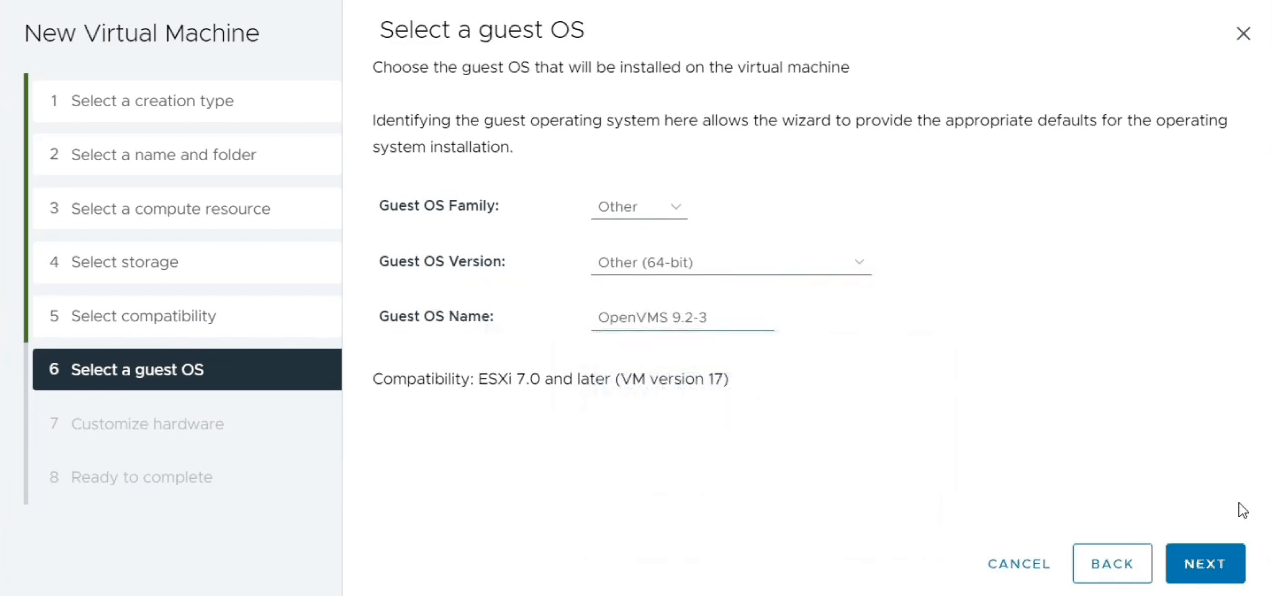
In the Select a guest OS section, set Guest OS Family to Other and Guest OS Version to Other 64-bit. Click Next.
-
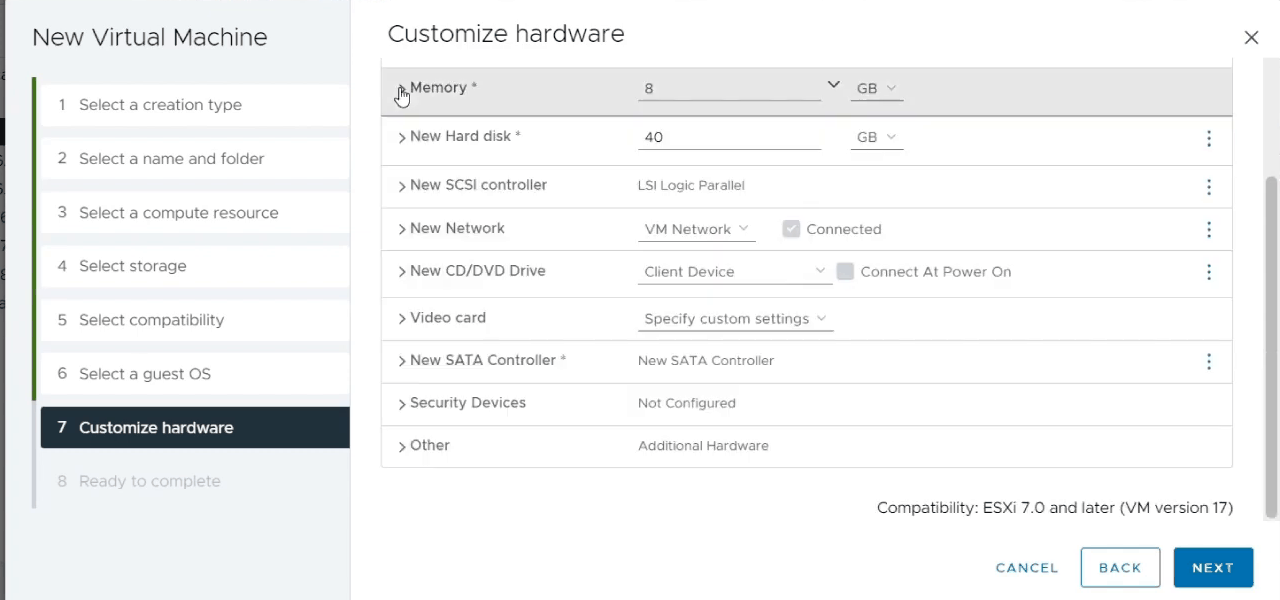
In the Customize hardware section:
- Set CPU to 2.
- Set Memory to 6 GB.
- Set the hard disk size to 30 GB and make sure it is placed on the iSCSI datastore.
- Click Add New Device > SATA Controller, then reassign the hard disk to the new SATA controller.
- Remove the default SCSI controller, since it is not needed.
- Under Network Adapter, connect the adapter to the distributed switch created in Step 5. Expand the adapter's settings and set a custom MAC address matching the DECnet address you plan to configure for this node once OpenVMS is installed.
- Under CD/DVD Drive, select Datastore ISO File and browse to the VSI OpenVMS x86-64 installation ISO image previously uploaded to the iSCSI datastore. Make sure Connect At Power On is selected and that the drive is attached to the SATA controller.
- Expand VM Options and set Firmware to EFI (instead of BIOS).
- Expand the Advanced section and set EFI Quick Boot to Disabled.
Click Next.
-
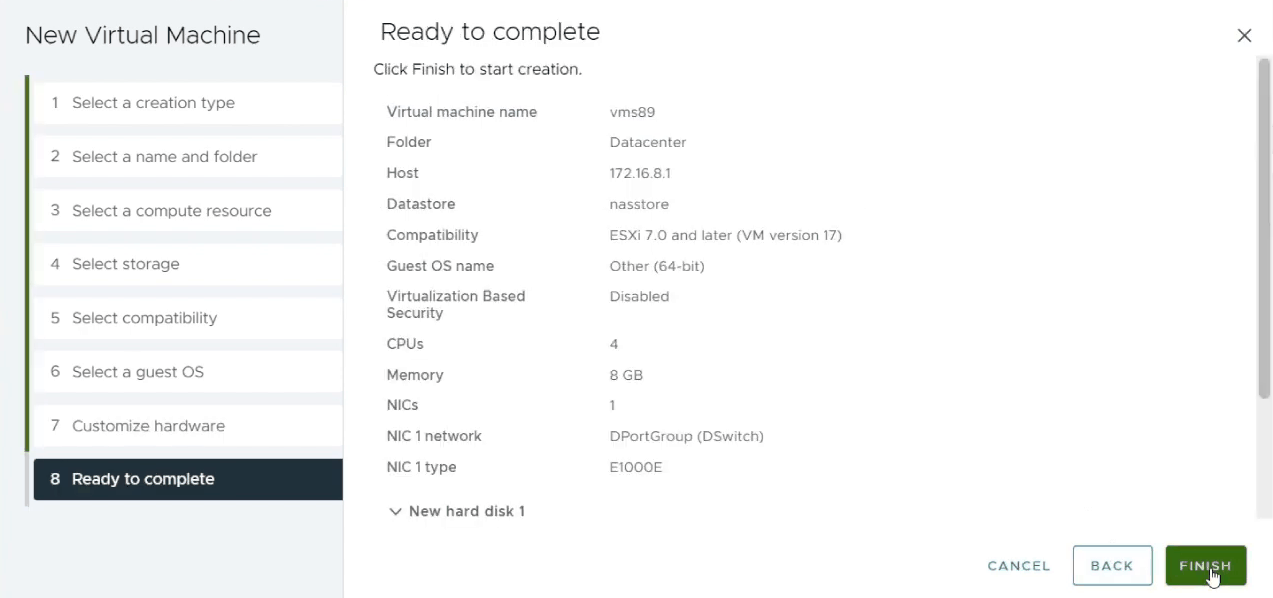
In the Ready to complete section, review the configuration summary and click Finish.
Step 8: Install VSI OpenVMS x86-64 and Join the Cluster
-
Power on the newly created virtual machine and launch its console.
-
At the Boot Manager screen, type
OPA0to enable the Guest Console.VSI OpenVMS Boot Manager: V9.2-* Build 160 ENABLED: Symmetric Multi-Processing ENABLED: Crash Dump Processing ENABLED: Legacy Serial Port Console for remote COM 1 ENABLED: Using Environment ROM Checking Required Processor Features: PASSED Identifying devices. This may take a while. COMPLETED VIRTUAL MACHINE GUEST: KVM (tm) No Mouse support; Use Command or Arrow Keys BOOT MANAGER DEVICE: DKA0 DEFAULT BOOT COMMAND: BOOT DKD1 0x00 0x00000001 BOOTMGR> OPA0 -
Boot from DKA100 (or a different emulated DVD drive) to start the OpenVMS installation.
-
From the installation menu, select option
1)and proceed through the standard OpenVMS installation. For detailed instructions, refer to the VSI OpenVMS x86-64 E9.2-4 Installation Guide. -
After the installation completes and the system reboots, configure TCP/IP networking and DECnet on the new node. For details on how to do so, refer to the VSI OpenVMS x86-64 E9.2-4 Installation Guide.
-
Add this system as a member of your existing OpenVMS cluster. For details on how to do so, refer to the Guidelines for OpenVMS Cluster Configurations chapter in the System Manager’s Manual Volume 2: Tuning, Monitoring, and Complex Systems.
-
Enable the Guest Console feature on this OpenVMS guest, if it was not already enabled during installation. For detailed instructions, refer to the VSI OpenVMS x86-64 Boot Manager User Guide.
Step 9: Perform vMotion on the OpenVMS Guest
-
In the left pane of the vSphere Client, right-click the OpenVMS virtual machine you have just installed and select Migrate. The Migrate wizard will open.
-
In the Select the migration type section, select Change compute resource only. Click Next.
-
In the Select a compute resource section, select the ESXi host in the cluster to which you wish to migrate your OpenVMS instance. Click Next.
-
In the Select vMotion priority section, select Schedule vMotion with high priority (recommended). Click Next.
-
In the Ready to complete section, review the configuration summary and click Finish.
-
Click on the virtual machine and check its IP address in the Summary tab. It should be updated to reflect the ESXi host to which the virtual machine has been migrated.