Fibre Channel Passthrough on ESXi Virtual Machine
Starting with the V9.2-3 release, OpenVMS x86-64 supports the VMware VMDirectPath I/O feature, which allows VMware ESXi virtual machines to directly access the physical PCI devices of the host system, bypassing the virtualization layer. The use of this feature allows for direct access to Storage Area Network (SAN).
For more information, see VMware VMDirectPath I/O Support for Data Disks.
Restrictions
-
Booting OpenVMS from a Fibre Channel disk is currently not possible.
-
The VMware VMDirectPath I/O feature is not compatible with the VMware vMotion feature.
-
N_Port ID Virtualization (NPIV) is not supported.
Supported Platforms and Hardware
- Host Bus Adapters
- Refer to the Supported Platforms page for the full list of supported HBA (Host Bus Adapter) devices.
- VSI OpenVMS Version
- VSI OpenVMS V9.2-3 or higher
Setting up Fibre Channel Passthrough
To configure your VMware ESXi virtual machine to use physical Fibre Channel disks of the host system, perform the following steps:
-
Make sure that a supported Fibre Channel HBA card is installed into your server and configured on your host system. For information on how to plug in and configure a Fibre Channel HBA, refer to the documentation for your system hardware.
-
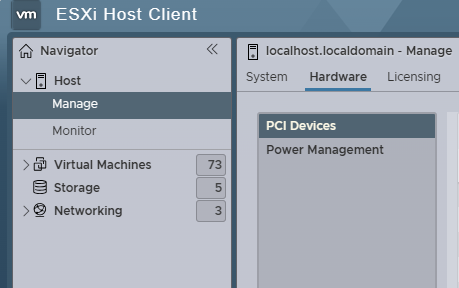
Use the browser to log in to the ESXi Host Client. In the left pane, expand Host, then click Manage.
-
In the Manage area, switch to the Hardware tab, then click PCI Devices.
-
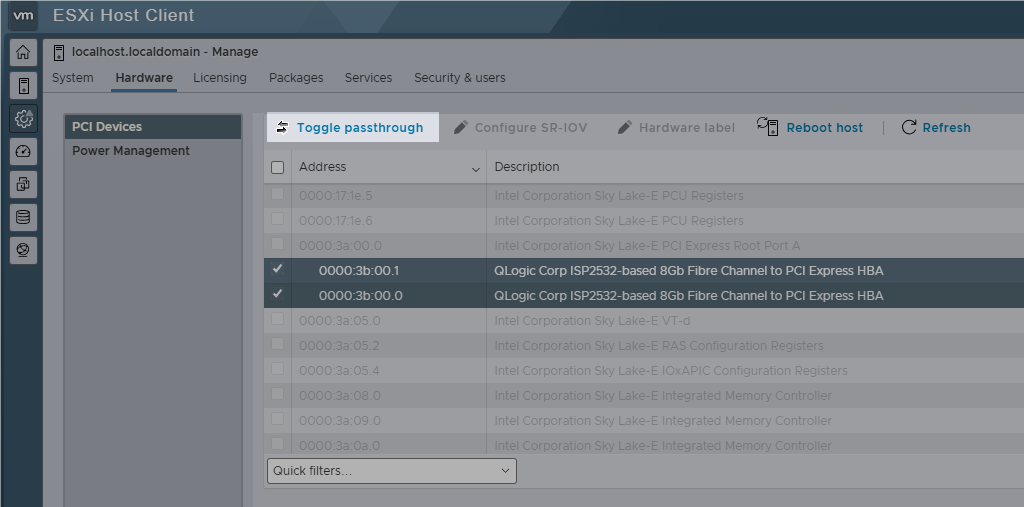
Select the devices that represent the ports of your Fibre Channel HBA and click Toggle passthrough.
-
Reboot your ESXi host system and log back in to the ESXi Host Client.
-
Bring up the Edit Settings window for your VM by clicking the Edit button.
-
In the Edit Settings window, click Add other device, then PCI Device.
-
Click the drop-down list next to your new PCI device and select one of the ports of your Fibre Channel HBA.
-
Create as many PCI devices as there are ports on your Fibre Channel HBA and map each device to a different port.
-
In the left pane of the Edit Settings window, click Memory, then enable the Reserve all guest memory (All locked) option.
-
Save the changes and close the Edit Settings window.
-
Power on your VM and boot OpenVMS from the Boot Manager.
-
Once booted and logged in to the system, ensure that OpenVMS has access to the Fibre Channel HBA(s) on your host system by entering the following command:
$ SHOW DEVICES /FULL FGYou should see an output similar to the following:
Device FGA0:, device type device_name, is online, shareable, error logging is enabled. . . . Device FGB0:, device type device_name, is online, shareable, error logging is enabled. . . . -
Log in to the management interface of your storage array and map the volumes created there to the HBA that your VM is using. For information on how to create and map Fibre Channel volumes, refer to the documentation provided with your storage device.
-
Identify and configure the volumes that you have mapped by entering the following command:
$ MCR SYSMAN IO AUTOCONFIGURE/FULL/LOGYou should see an output similar to the following:
%SYSMAN-I-OUTPUT, command execution on node MM2442
%IOGEN-I-PREFIX, searching for ICBM with prefix SYS$
%IOGEN-I-ACTIVATE, activating ICBM SYS$ICBM
%IOGEN-I-FIBREPOLL, scanning for devices through FIBRE port FGA0
%IOGEN-I-FIBREPOLL, scanning for devices through FIBRE port FGB0
%IOGEN-I-CONFIGURED, configured device DGA19
%IOGEN-E-NODEVID, no identifier defined for device unit D19
%IOGEN-I-CONFIGURED, configured device DGA19
%IOGEN-E-NODEVID, no identifier defined for device unit D19